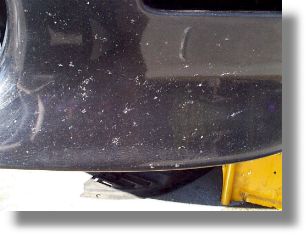
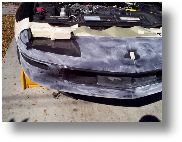
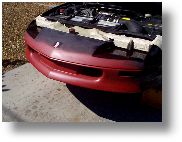
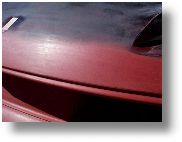
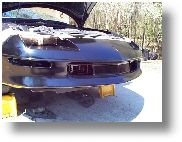
I'm sure you can
see the difference in the above pictures! You can plainly see in the
"Before" picture how there is a ton of bug and rock damage not to mention the
gray appearance which appears to be under the clearcoat. The "After"
picture shows what it looked like PRIOR to wet sanding and buffing. After wet
sanding and buffing, it looks even better! :)
Note: All images below are thumbnails. Click to view larger image. |

|
First of all, I'd like to recognize the guy who did the work on my car. His
name is Eric Thompson. He did an outstanding job and took much pride in his work.
I've found it difficult to find people like Eric who take such great pride in what
they do and it is comforting to see there are still people like him out there! If
you live in my area and need that keyed door, rock or bug damage fixed, give Eric a call
at 352-341-5551... you won't be disappointed!
|
|
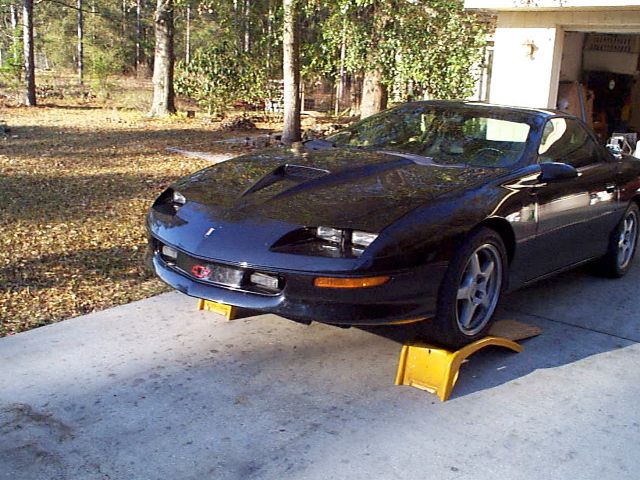
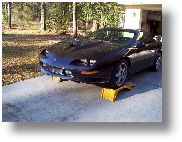
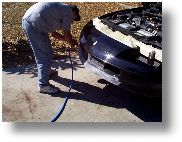
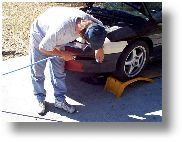
| The easier you can make it, the better.
Since this involved only painting the front facia of the car, I wanted to make this as
easy as possible so I put the car up on ramps for Eric before he showed up. This
allowed him to more easily paint the front facia as it turns and goes under the car.
He liked this idea and said he'd have to go pick himself up a set of ramps :-) |
 |
|
| Even though Eric would have done this, I went
ahead and removed some of the items I could. It is always better to take things off
than to tape them off in my opinion. The turn signals in this car are fairly easy to
remove. You just need to remove the hard plastic horizontal pieces on each side of
the car just in front of the wheel well. These are held in place by 10mm and 8mm
screws. There is also a clip that holds the piece from flapping around. The
first picture shows this piece that must be removed and the second shows the backside of
the turn signal. There are three 7mm screws that need to be removed in order to pull
the turn signal out. You don't need to disconnect any wires... just lay the turn
signal "inside" the front facia on the lower lip. |
|
|
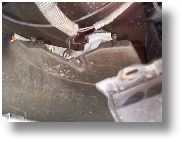
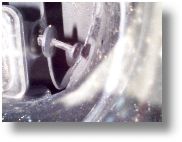
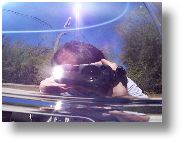
| Removing the fog light can be a bit tricky but
it's not too hard. I've done this several times due to burnt out bulbs and am quite
good at it :) I use a pair of long, narrow needle nose pliers, a flat head screw
driver, and a #15 Torx driver. Use the flat headed screw driver to get the plastic
pins in each side of the fog lamp to start to back out. When the pin is out a little
bit, grab it with your needle nose pliers and pull it out slowly. With any luck, as
the pin comes out, it will pull the clip with it. This usually happens but if it
doesn't, just use your needle nose pliers to pull the clip out as well. The reason
long and narrow needle nose pliers is so important is because there isn't a lot of room to
work on the inner pin of each fog. Also, if you drop one of these pins or clips,
it's going right into the front facia! This can be a pain to get out but what I've
done in the past is "bounce" the pin/clip to a side opening then just reach up
in there and pull it out! The first picture shows the pin partially pulled out.
You can see how the clip started to come with the pin as I pulled it out. The
second picture shows the Torx screw and how tight it is on the inner side... yep, the clip
and pin are back in there! Once you get the two clips out, remove the fog angle
adjustment Torx screw. Be careful when you do this as there is a spring in there and
you don't want to lose this spring. With the two clips and the Torx screw out, the
light will pull straight out and you can unplug it. IF by chance you drop one of the
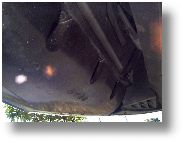
clips into the front facia and can't get it out, you can remove three more similar clips
under the car. With these removed, you can pull down the plastic piece that curves
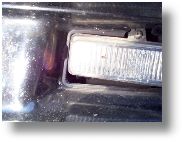
up near the radiator. The third picture shows these three clips. |
|
|
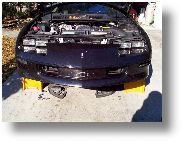
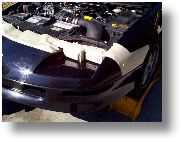
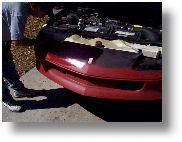
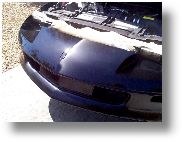
| Here is what the car looks like with the fog
lights and turn signals removed. Notice also the missing Chevrolet Bowtie emblem.
This is held on by double sided sticky tape. I just pulled it off and will
paint this myself a bit later. |
 |
|
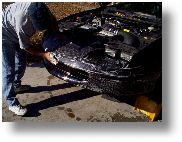
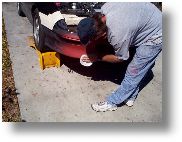
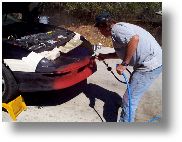
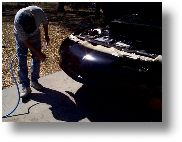
| Now we begin to prep the surface of the car.
You do this using green "scrubby pad" and an all purpose cleaner such as
Fantastik or 409. Eric used some special stuff but said the above would work fine.
Squirt the entire surface with the all purpose cleaner then scrub away with the
green scratch pad. This removes any old wax and bugs. This also scratches and
scuffs the surface to allow the paint to stick to the car... if you don't plan on sanding
all areas of the paint. |
 |
|
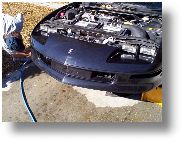
| After scuffing all areas you wish to paint,
rinse it off with water then blow the excess water off with an air hose. |
 |
|
| Mask off all areas where you don't want paint.
How much you need to mask off will depend on what type of paint gun you use.
Eric uses a very high quality low pressure high volume spray gun. This type of gun
creates very little overspray so not as much area needs to be masked. If any
overspray does get on anything, lacquer thinner may be used to remove it... but it's
easier to just do a good tape job! |
 |
|
| This next part is an "extra." :)
This car came from Texas. Texas is a state which requires the use of a front
plate. Because of this, my car had two big and ugly screw holes in the facia.
I asked Eric if there was anything he could do to fix this and he said SURE! He
used a method/technique I had never heard of before. He put some Locktite Quicktite
Super Glue Gel on a piece of 180 grit sandpaper. He then placed the dab of glue on
the screw hole then began sanding. He said what this does is creates a very hard
compound that is made of the super glue and dust from the sanding! He did this a few
times with the gel then switched to using a superglue liquid on 320 grit sandpaper.
This was then followed up by sanding with straight 320. The result was a filled hole
that was smooth to the touch! This can be primered immediately and is much better
than bondo because it won't shrink and/or crack! A very neat little trick which can
also be used to repair small cracks and tears in fiberglass. The first picture shows Eric applying the gel super glue to the screw hole.
The second picture is during the process. The third picture is a filled hole! |
|
|
| It's now time to sand out the damage caused by
the rocks and Love Bugs with a high speed air sander commonly called a DA (dual action)
sander. If you are very good and the damage is only minimal, you can get by with
only sanding the clearcoat then reapplying just clear. Since my damage was
completely through the clear and paint, Eric decided to go ahead and sand the entire area
to be painted. If damage is fairly light like it was in my case, you would sand with
320 grit. For heavier damage use 180 and for bad scrapes that require sanding into
the fiberglass, use 80. If 80 or 180 grit are used then follow up by sanding with
320. Once sanding is complete, you need to sand with 600 grit over the entire paint
area. You are now ready to remove the residual dust. Do this by using a rag
and a solvent remover. Go over the car twice with this to ensure all dust and
"grime" is removed. |
|
|
| You are now ready to apply primer. Eric
didn't use a paint gun for this but instead used a spray can of primer which he said works
very well. Be sure to apply primer to all areas where you sanded completely through
the paint. |
 |
|
| Once you are sure that all damage as been
removed and you have a fairly smooth surface, sand with 600 grit sandpaper. You will
still see sanding scratches but so long as they are the 600 grit sanding scratches (or
finer), you'll be just fine as the paint and clear will fill these in and they won't be
noticeable. |
 |
|
|
| Once you have completed your sanding, go back
over the entire paint area with the solvent remover. If you didn't completely sand
through the paint, you'll be able to see if you left any damage behind because the paint
turns very bright and shinny. Do the solvent remover application twice. |
 |
|
| You are now ready to use a tack cloth on the
car. Wipe with the tack cloth as you use compressed air to blow anything out of the
nooks and crannies. This is the final step prior to applying paint so look closely
for anything you may have missed! |
 |
|
| OK! Now is the time to apply the base
coat color! This is where the project really turns into a "skill."
Painting isn't something that you are an expert on the first time you try it. It
takes good equipment and practice. I had a decent gun but ZERO practice... which is
one reason why I'm extremely happy I found Eric to do the car for me! The gun used in this application is a Sata Mini Jet. It is a high
volume low pressure gun made for more for detail painting like this than painting an
entire car. Keep in mind that if primer was used, a couple coats of base color will
most likely be needed. Also, the color black is particularly unforgiving as all the
imperfections will come out at ya! But, Eric did a great job on the prep and this
came out looking great!
Also, don't worry too much about minor sanding scratches.
The ones that you can still see will most likely be filled by the clear or the
second coat of base color. This job took about a pint of paint. |
|
|
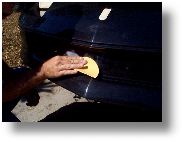
| It's now time to apply the clear coat.
There are many grades of clear. Eric used a high grade clear on my car. Let the base coat dry then go over it with a tach cloth and pressurized air
to remove any dust that may have settled on the car. Using clear is not an easy
task. Eric told me of many tricks he uses to ensure the job comes out looking great.
How far you hold the gun from the paint, the pressure at which the clear is
applied, applying it thick enough yet not so thick to cause a run... all these items and
more are important for good results. Seeing as how it is painted outside, you may
end up getting a bug or spec of dust in the clear. This is not a huge deal as
whatever gets into the clear (so long as it's minor) can usually be wet sanded and buffed
out.
In the bottom picture take note of how the clear brings out
the color. The base is very dull but comes to life once the clear is added! |
|
|
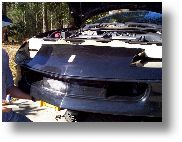
After the clear
has dried (which will dry to the touch in a matter of minutes on a sunny day) you have
completed the painting portion of the project! You can carefully remove the tape now
and check for any signs of overspray. If you find you didn't tape far enough back,
you can use lacquer thinner to remove the overspray. If at all possible, do not
drive your car that day or reinstall the fogs or turn signal lamps. Even though the
paint is dry to the touch it is still "soft" and susceptible to damage.
I'm waiting a couple days to install my bowtie emblem and fogs. As for wet sanding
and buffing, it is a good idea to wait about a week to do that. If everything was
done properly during the painting process, you most likely won't need to wet sand and buff
the car! Eric will stop back in a week to wet sand and buff my car but not because
it doesn't look good now. Painting a car outside is difficult to do and have it come
out looking "show quality." It was windy this day and a small bug was
attracted to the clear :-) Because of this, Eric applied some extra clear to the car
to give him more to work with when he wet sands it and buffs it out. Below are
pictures I took following just the paint and clear! As you can see, it came out
GREAT so the reason for the wet sanding isn't a quality issue. I purposely took
these pictures like this. I wanted to show how good the reflection of the paint is
:)
|
|
|
This space
reserved for final pics after wet sanding and buffing! |
|
|
|
|
|
|
|
Once again, I'd
like to stress how this project is probably more than a "do it yourselfer" type
project. However, I was going to try this myself and give it a shot... until I met
Eric. The purpose of this page was more to demonstrate the process of fixing a bit
of bug and rock damage. Also, I have a digital camera which I love to use! :)
If you want to try something like this, GO FOR IT! The worst thing that can happen
is the job won't come out quite as you expected and you'll have to take it to a
professional to have them fix it. With that being said, I still recommend you trying
to find somebody like Eric in your area. Eric doesn't call himself a
"painter." He considers himself more of a reconditioner since he doesn't
paint entire cars and instead concentrates on doing repair jobs such as this. These
guys already have all the materials and don't have the problem of buying four times as
much materials as is required for the job since they can use the "extras" on the
next job :) Like I said above, materials would have cost me over $150. Most
Eric's repair jobs run from $60 to $85. Mine would have been $75 since he applied a
base coat color but he charged me only $60 since that is what he quoted me when we first
talked. Still, even at $75, it's an unbeatable deal IMO... $150+ for materials or
$75 to have somebody else do it and supply the materials... you do the math :-)
Heck, since Eric does such a great job and takes pride in his work, it may be worth it for
some of you Central Florida guys to drive on over and visit good old Inverness for a day
on the weekend. I'd love to meet some of you and we could go have a beer while your
car is being fixed! :)
If you found this page interesting, you
might also want to check out a similar page by Kelly Drown. He goes into great
detail explaining how to do a "spot repair" on a 4th Gen Trans Am. Check
it out!
Kelly's Body Work - Deep Scratch
with Minor Dent Page
If you have any questions or comments about
this page, let me know!
bfranker@tampabay.rr.com |
|