On this page I'll describe how to do the
following three maintenance items on your 4th Generation F-Body:
1. Engine Oil Change
2. Rear Differential Oil Change
3. Transmission Fluid Change for the M6

ENGINE OIL CHANGE

I use Mobil 1 synthetic 10W-30 weight oil. I've
heard nothing but good about this oil and it's readily available at the local autoparts
store. For the filter, I'll use the the Mobil 1 filter when AutoZone runs a special
on them, but since I change my oil every 3,000 to 4,000 miles, I don't see the need to
spend $10 on the filter and the regular AutoZone filter (D432) has always worked well for
me.
First off, you'll notice in the following pictures
that I'm doing all this using a lift... my buddy allows me to use his lift when it's not
booked for his shop work :-) If you're not so lucky, a set of ramps for about $20
from Wal-Mart will work. In some cases, you may need to also go to the local lumber
yard and buy a few feet of 2" x 10" or or 2" x 12". Depending on
the type of ramp you get, it may or may not be suited for the low F-Body. I've heard
Rhino ramps work well but don't have a set myself. I use a regular set of ramps and
a couple 2" x 10" or a jack and jack stands when I don't have access to the
lift.
For this project, you'll need the following:
5 quarts of engine oil. Cost for the good
stuff - $22.74
1 oil filter. ~$10 for the Mobil 1 filter or
$3 for a regular filter (AutoZone D432).
Tools & Supplies - 15mm wrench or rachet &
15mm socket, awl (optional), filter wrench, rags, drain container for used oil.
Total cost for this project - ~$25 for me but can
be done for under $10 using non synthetic oil

1. Position your drain pan under the drain
plug. Using a 15mm wrench or socket, slowly remove the drain plug. Note:
It is best to do all of these fluid changes listed on this page after you've been driving
the car for a period of time. This allows the oils to come up to temperature and
will allow them to drain more quickly. Also note that this will mean the oil will be
warm and maybe even HOT so be careful! Also, I've seen some drain plugs with washers
and some without. Just be aware of this and take note before you completely remove
the plug. These are easily lost if you forget about them and leave them in your used
oil!

2. With the engine oil draining out the plug,
you can now either just remove the oil filter or punch a hole in your filter, drain it,
then remove it. In the picture to the right, you'll see that I punched a hole in the
filter. Sometimes I do this and sometimes I don't... it really doesn't matter but
the mess is a little less if you punch a small hole into it with an awl. The only
thing with this is that if you punch a hole in your filter, you best be sure you can get
it off! Most of the time, you won't be able to remove the filter with your bare
hands. You'll need some type of tool to do this. There are a couple different
kinds that work well. One is a cup type tool that fits on a socket wrench and
"grasps" the filter so you can turn it. The other is a tool that has a
metal band. Depending on which way you place this tool on the filter will determine
if you tighten or loosen the filter. With the Mobil 1 filter pictured above, the
band clamp type tool works much better since this filter has no ridges for the other type
tool to "grab."
3. Once all the oil has drained, reinstall the
drain plug. Be sure to wipe off any dirt/debris that may be on the threads.
Tighten the drain plug so it is snug. The "by the book" torque spec is 15
ft-lbs but not even I am anal enough to torque my drain plug using a torque wrench :-)

4. Get ready to reinstall the filter.
First of all, check to make sure that the old gasket isn't still seated up on the
engine! This can cause an oil leak at the filter if you install your filter and
gasket on top of the old gasket. Although it doesn't happen often, I've seen the old
gasket stick up there so it's always best to check up there and on the old filter to
ensure the gasket came down with the filter. Now take a little bit of the engine oil
and, with your finger, wet the new filter's gasket. This is the black ring on top of
the filter in the picture to the right. Now take a quart of your oil and fill the
filter prior to screwing it on. While the oil pump is filling the filter, it's not
sending oil to the engine. Filling the filter first will help in your car building
up pressure quicker after the initial start. I've done many oil changes in my days
and never used to do this. Does it really help a lot? Who knows... Does it
hurt? NOPE! So, might as well do it!
5. Screw your filter back on. It should
go on easily until the gasket meets the surface. There will most likely be
tightening instructions on your filter. I normally just hand tighten my filters and
do not use a wrench. I've never had any leaks doing this. But, if my hands are
oily, I'll snug up the filter with a wrench "just to make sure." These
filters don't have to be super tight and over tightening them just makes them more
difficult to remove.

You're now ready to fill her back up! I use an
even 5 quarts. If you use an oversized filter, you'll need a bit more. The oil
fill is located on the passenger side valve cover. Sometimes the plastic tube that
connects to the valve cover will become loose or might even break. Don't worry
because the cap that is on this tube will screw directly into the valve cover and take the
place of the filler tube. You can try to be the Mr. Quaker State Man and dump the
quart of oil directly into the valve cover, but I myself am not quite that good so I use a
funnel :-)
You're all set now! Just remember to do a quick
check for leaks after you start it.
REAR DIFFERENTIAL
OIL CHANGE
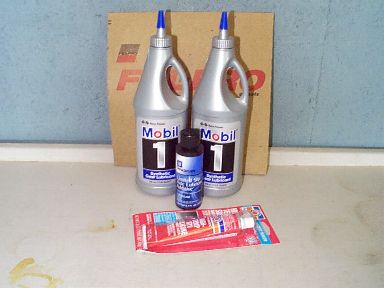
For this project, you'll need the following:
2 quarts of Gear Lubricant. I used SAE 75W-90
Mobil 1 Synthetic Gear Lube. Cost - $14.82
10 Bolt rear differential cover gasket.
Felpro part number RDS 55072. This won't be required if you choose to use the
"gasket in a tube" type stuff or just the RTV.
Gasket cost - $3.40
1 bottle of GM rear differential additive. GM Part
number 1052358. Some people who use synthetic oil, don't use this and say you really
don't need it. I have used it a couple times with synthetics "just to be
sure" and have had no problems or noises. This could be considered optional and
you can always add it later if you find you "need" it. Cost - $6.79
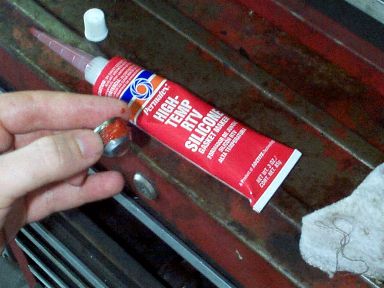
High Temperature RTV Silicone - This is optional
but I recommend it for at least sealing the fill plug and it's not a bad idea either to
use this on the gaskets. I've installed rear differential gaskets before without
using this and have had no problems. In fact, I wasn't planning on buying this but
while at the auto parts store a guy recommended it so I figured "what the heck"
and bought a tube. Cost - $4.23
Tools & Supplies - 1/2" wrench, 3/8"
socket wrench, razor blade, carb/brake cleaner, drain container for oil, rags.
Total cost for this project - $29.24... assuming
you buy the optional stuff above and use the good synthetic gear oil :-)

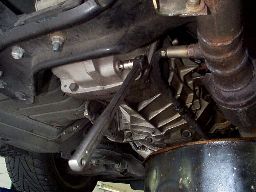
This is a picture of the rear differential in my
96SS. Yours will most likely look a little different because this is SLP upgraded
Torsen rear that was offered on some of the SS Camaros. The concept is the same
though. Notice the oil "seepage?" This isn't from the gasket area
but from the axle area. I don't particularly "like" this, but it happens
on almost every F-Body I've seen so I actually consider it "normal."
1. First thing you have to do is remove the
rear differential cover. In GM's infinite wisdom, they FORGOT to engineer in a drain
plug... DOH! Because of this, you pretty much have to remove the rear cover to
change the oil. This is the reason for the new gasket if you chose the gasket method
over the RTV method. It is easiest to use a 1/2" socket to remove the bolts you
can get to, but some of them near the sway bar will require the use of a 1/2"
wrench. Before beginning, get your oil drain pan aligned under the differential as
it will start to leak out as you loosen the bolts. Note: You may need to use a
pry bar to slightly pry the rear sway bar out of the way. Mine wasn't in the way by
much but I did have to pry it about 1/4" away from the differential in order to
remove two of the bolts. I found this to be MUCH easier than removing the entire
sway bar! There will also be two wire brackets on two of the top bolts. Just
move these out of the way when you take out these bolts. Once all the bolts are
removed, you'll probably have to take your flat headed screwdriver and slightly pry the
cover away... they usually stick a little. Doing this will complete the draining.
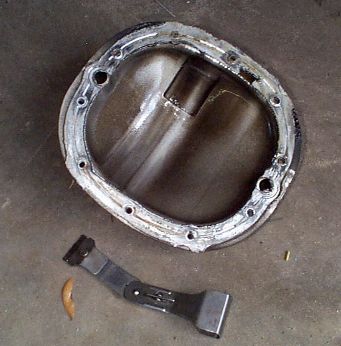 
2. Now you need to remove the old gasket or liquid
gasket RTV from the differential cover. Use a sharp razor blade to do this.
Also, this cover may, again, look a bit different than yours. If I remember
correctly, the standard F-Body cover has a hunk of magnet in it to catch any metal
filings. Once you get the mating surface cleaned up with the razor blade, you can
clean it up a bit with either brake or carb cleaner. These can be bought at an
autoparts store for around $1.50 a can.
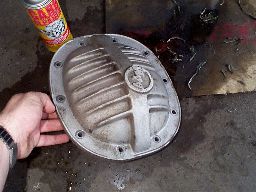
You can even use the carb/brake cleaner to clean the
outside of the cover. This stuff works great to easily blast away even caked on gunk
and grime!

3. Now scrape away and clean the surface of the
differential mating surface like you did the cover above. This picture shows the
sealer still on the surface.
Nice Torsen, eh? :-)
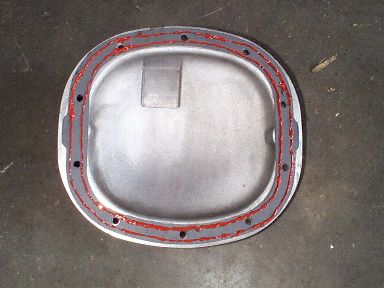
4. You're now ready to put the cover back on.
Here is where you can learn from my mistake! Remember above where I said the use of
this red RTV sealant is completely optional? Well, I hadn't used it before and did
so this time just as a precautionary measure... even though I've never had any leaks on my
94Z. Anyway, the way I did it was to place two bands around the edge of the gasket
as shown in the picture to the right. I then flipped the gasket (placed gasket with
RTV on the cover) and did the same thing. Well, I neglected to remember that when I
took the cover off, it bumped into the sway bar and a couple other things under there
while I was pulling it down... basically it was a tight fit. Soooo, when I went to
re-install the cover (as shown above) I smeared this RTV on my sway bar and some other
stuff while getting it in place. It would have been better (if you choose to use the
RTV) to apply the RTV to one side of the gasket, stick the gasket on the differential
itself, apply the RTV again to the other side of the gasket (while it's in place on the
differential) THEN put the cover in place. So, do yours like that :-) NOTE: You'll notice above I
covered up two holes in the differential cover (see earlier picture). This is a
Torsen rear end but I do believe even the non Torsen rear end 4th gens also have these
holes in the rear end and cover. This picture shows them covered up but at the
moment I am not using a gasket and only RTV and did not cover these holes. There is
some controversy on if you should or should not cover these holes. Take a look here
for some info... http://www.socalss.com/special/holes.htm
and you can decide for yourself what you want to do. I chose not to cover up the
holes since this picture was taken.
5. Take your ten bolts and snug them up finger
tight. Don't forget to re-install the two wire brackets on the bolts on the upper
half of the differential! If you don't have a good feel for tightening things, you
should tighten these to 22 ft-lbs in a crosswise pattern. I didn't use a torque
wrench... I just tightened them snug in a crosswise pattern.

Now that everything is buttoned back up, it's time to
refill the rear differential with oil. Once again, the GM engineers made something
that should be easy a bit difficult as the fill port is not in an easily accessible
area... oh well :-)
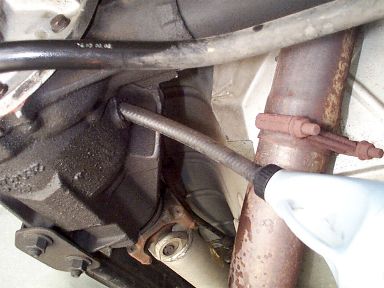
6. Remove the fill plug. I don't have a picture
of the plug, but it was obviously located where the black tube in this picture is sticking
into the differential. To remove this plug, all you need is a 3/8" ratchet.
You may find it a bit easier to use an extension but it isn't required. Note:
No special attachment is required on your ratchet, the 3/8" ratchet itself
fits into this plug to allow you to remove it.
7. Now that you have the plug out, grab 1 quart of
your gear lube. Even with the spout on most gear lube bottles, it is still a pain to
"pour" it into this hole. I find it much easier to attach some kind of
tube or hose like pictured above. Now, "squeeze" this quart of oil into
the rear differential. NOTE: Ensure your car is mostly level while filing.
Since you are filling to "overflow" (see below) the angle of the car will
determine exactly how much fluid you are able to get in there.
8. Once you've emptied 1 bottle of gear lube, take
your GM Limited Slip Differential Additive and squeeze it in there too.
9. Position your drain pan under the rear
differential in preparation for spillage :) Take your second quart of gear lube and
begin squeezing it in. Once you get a little more than half of it in, slow down a
bit. The idea here is to fill it up until it starts coming out the hole... this
means it's full :-) I got in all but 450ml of the 2nd quart. Not sure if yours
will be exactly this amount or not but I do remember it taking about 1.5 to 1.75 quarts
the last time I changed this fluid in an F-Body with the regular rear differential.
Also, if you aren't able to completely level your car while filing, if you use about the
same amount as I did, you'll be just fine... I did mine on a lift with everything
completely level so my volumes should be accurate (+/- a little possibly due to the Torsen
rear).
10. Now that you have oil slowly running out the fill
hole, it's time to re-install the plug. I used a dab of the RTV sealant on the
plug's threads. This probably isn't actually required, but I highly recommend it...
just more added protection against a leak developing.
If you wish to torque this plug, the torque value is
26 ft-lbs. Again, I didn't torque it... just snugged it up :-)
That's it! Start it up, drive it around for a
few minutes, then check for leaks!
M6 TRANSMISSION OIL CHANGE

For this project, you'll need the following:
4 quarts of Dexron III Automatic Transmission
Fluid. Yep, that's no typo... you use ATF in your M6! Again, I prefer the
Mobil 1 Synthetic ATF. Cost - $21.16
High Temperature RTV Silicone - This is optional.
Cost - $4.23
Tools & Supplies - 3/8" ratchet, drain
container for oil, rags.
Total cost for this project - $25.39 for me but it
could be done for less than $10 using non synthetic ATF.
1. Drain the oil. This is an easy project
because GM actually gave us a drain plug this time! The A4 guys aren't so lucky!
:) To remove the drain plug, use your 3/8" ratchet. Be prepared for a
large GUSH of oil. This oil isn't too thick and the drain hole is quite large.
The oil will shoot out the drain hole horizontally about one foot! You've been
warned :)
2. Re-install the drain plug. Again, like the
above rear differential fluid change, I used RTV silicone to ensure no leakage. If
you wish to torque this one to spec, it's 20 ft-lbs. But, like the others I did, I
only snugged mine up.

3. Remove the fill plug. Like the drain plug,
this will require a 3/8" ratchet.
4. Fill with transmission fluid. Note:
This picture is used only for illustration of a good fill mechanism :-) Also, ensure
your car is mostly level while filing. Since you are filling to "overflow"
(see below) the angle of the car will determine exactly how much fluid you are able to get
in there. If you are not able to get your car perfectly level, using the same amount
of fluid as I did (see below again) will ensure you don't have too much or too little oil
in your transmission.
Once again, the GM engineers did a number on us by
making it a slight pain to fill the M6 transmission. Notice how the rear
differential fluid change section came before this one? I did that for a reason :)
I used the Mobil 1 ATF and if you haven't noticed, this oil has a larger than
normal cap. For this reason, I couldn't just easily screw on the cap and hose
pictured to the right. What I did was poured my ATF fluid into one of the empty rear
gear lube bottles. A little residual gear lube won't hurt anything here in case
you're worried about that. If you're not doing all these at the same time like I did
and don't have a gear lube bottle to use, you can try an empty shampoo bottle or something
that can be squeezed to add the oil.
Squeeze your first 3 quarts of ATF into the tranny.
This works the same way as the rear differential lube change... you fill until oil
runs out the fill hole. Because of this, get your drain pan in place prior to adding
the 4th quart. When you get about 1/2 of this last quart in, slow down. I was
able to get all but the last 300ml of oil from the 4th quart in.
5. Once you have a small amount of oil running out
the fill hole, place a small dab of RTV (like above) on the fill plug and install it.
Again, if you wish to torque it using a torque wrench, the correct value is 20
ft-lbs. And again, I didn't torque mine... just snugged it up!
That's it! Start it up and drive around for a
few minutes then check to ensure no leaks!
Well, that does it for the 4th Gen Lube Change
Page! :-)
If you have any questions, comments, or
suggestions, please send me an email!
bfranker@tampabay.rr.com
|
