This guide will be extremely detailed. I'm making it like this so even people who think they aren't capable of working on their car, will, in fact, be capable of doing this. Many of you could probably do this with no guide at all. Some could read through it and go out to do it. Others will refer to the guide step by step. Enjoy! Note: Each picture will be a clickable picture to a larger picture if you need to see more details. |
|
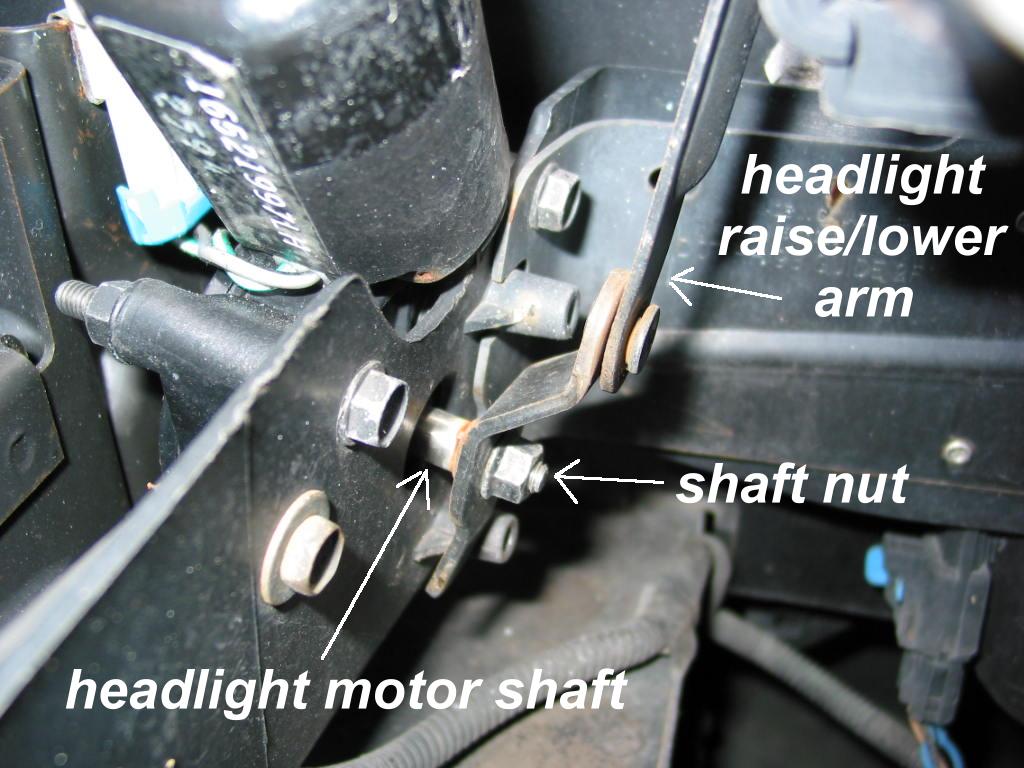
| This guide will detail the installation of the gear
on the driver side headlight of a 1995 Trans Am. The other side is essentially the
same with only minor difference. Locate the headlight motor next to the headlight. |
 |
| Your car may or may not still have the cover which goes over manual raise/lower knob. Remove the cover to expose the knob. | 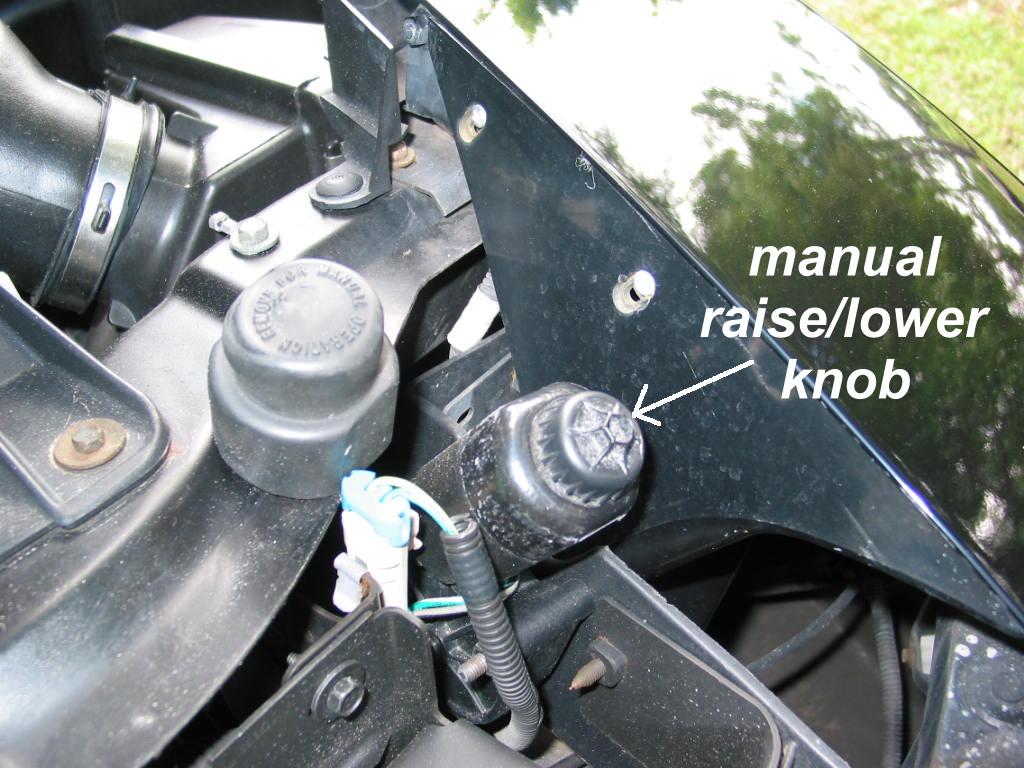 |
| Using the knob, raise the headlight to the full up position. | 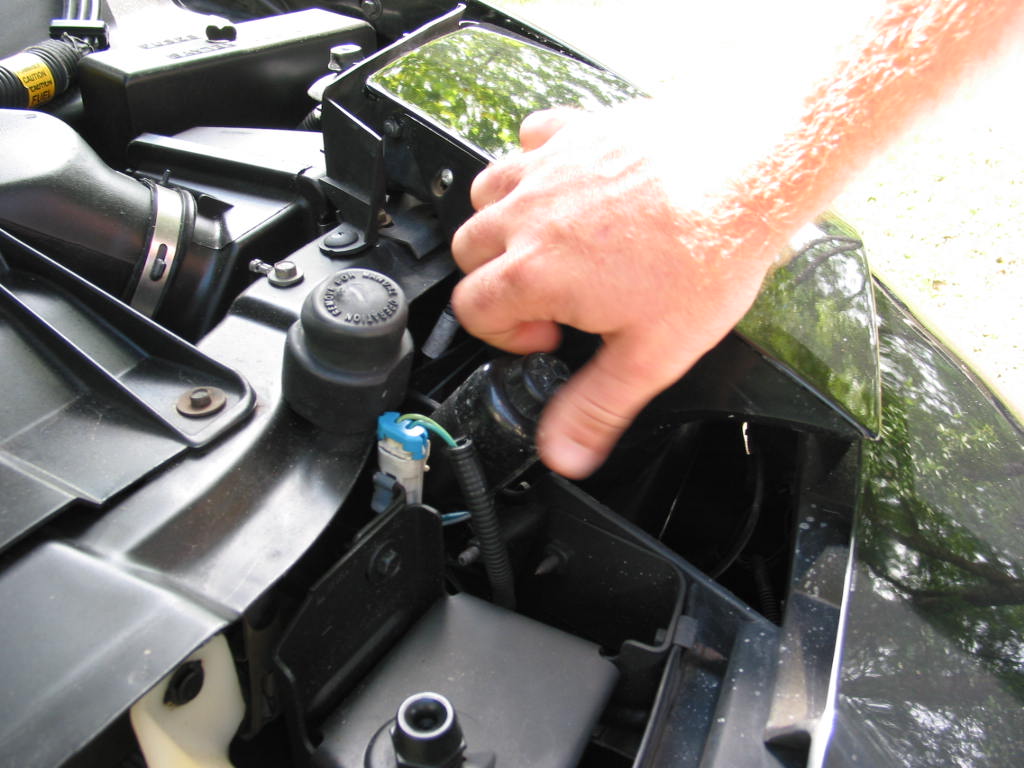 |
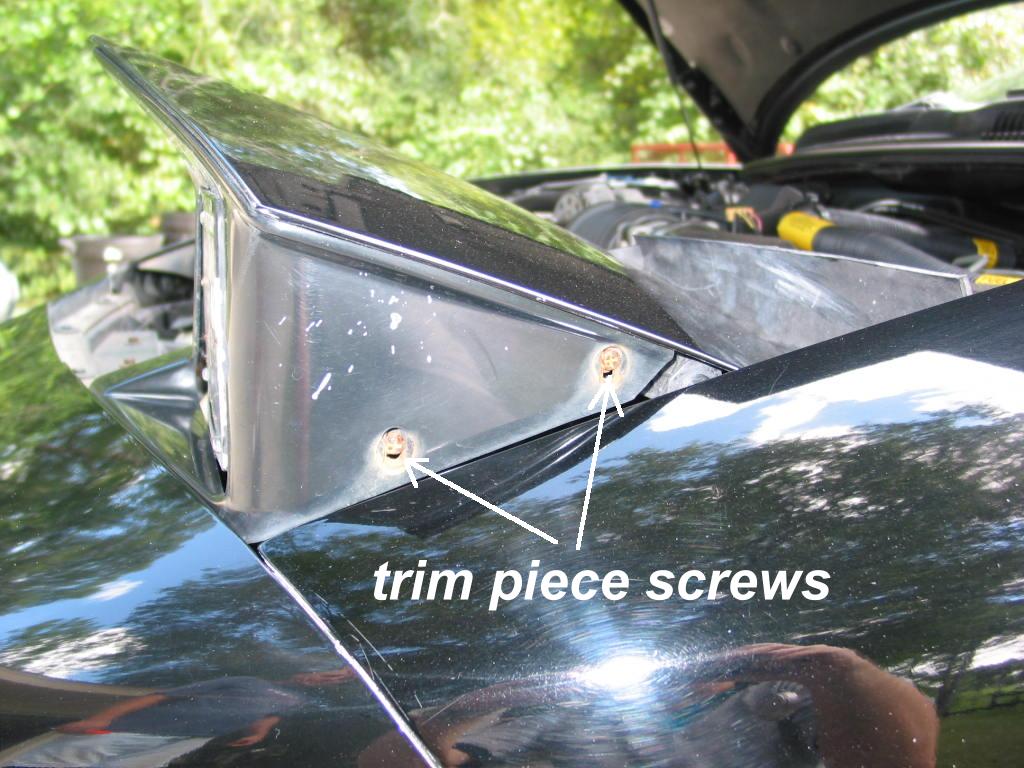
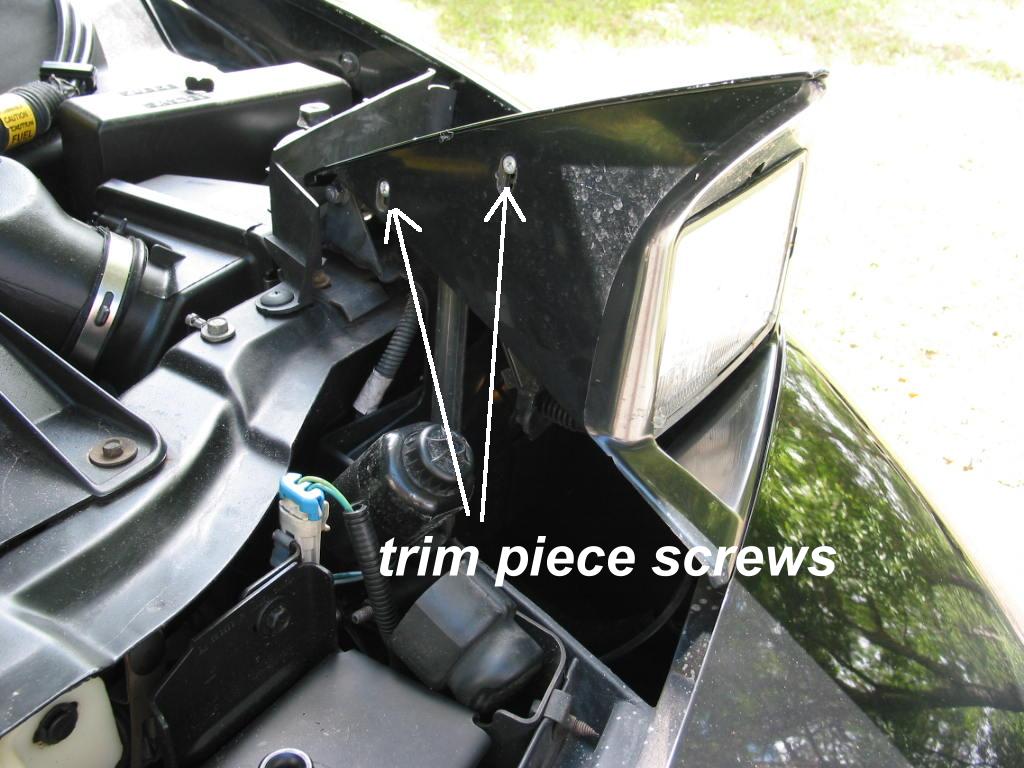
| There are 4 screws which hold a trim piece on around
the headlight. I highly recommend removing this trim piece as it makes it much
easier to get your hand down in there later on. Remove these screws and pull the trim piece straight out. You may need to slightly lift up on the headlight or push down on the nose of the car to get enough clearance to pull this trim piece off. With this trim piece removed, you'll have a slight gap between the headlight and the front nose. You can roll up an old terry cloth towel and place it between the light and the nose. This will keep the light up at all times even when you remove the raise/lower arm in the next few steps. |
|
| Disconnect the electrical connector for the the headlight motor. | 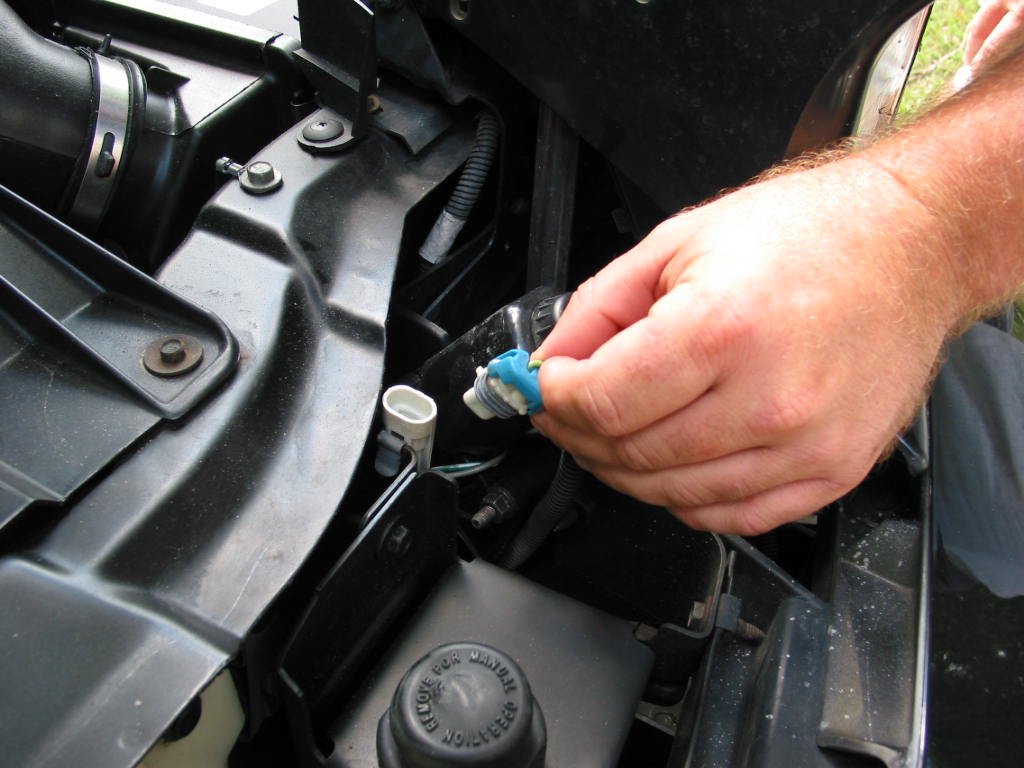 |
| Remove the headlight motor shaft nut. These
nuts are often times rusted or stuck on there pretty good. If it doesn't want to
loosen very easily, I recommend using something like Liquid Wrench to help out. Once you have the nut removed, you will most likely need to spray Liquid Wrench (or similar) on the shaft where the raise/lower arm is attached. This is almost always stuck on there and even heavy prying doesn't remove it without the use of some type of lubricant. Leave the raise/lower arm attached to the motor shaft for now because it'll keep the headlight up for you while you get at the rest of the bolt heads. |
 |
| There are now only three more nuts which need to be removed to pull out the motor. These are 10mm in size. | 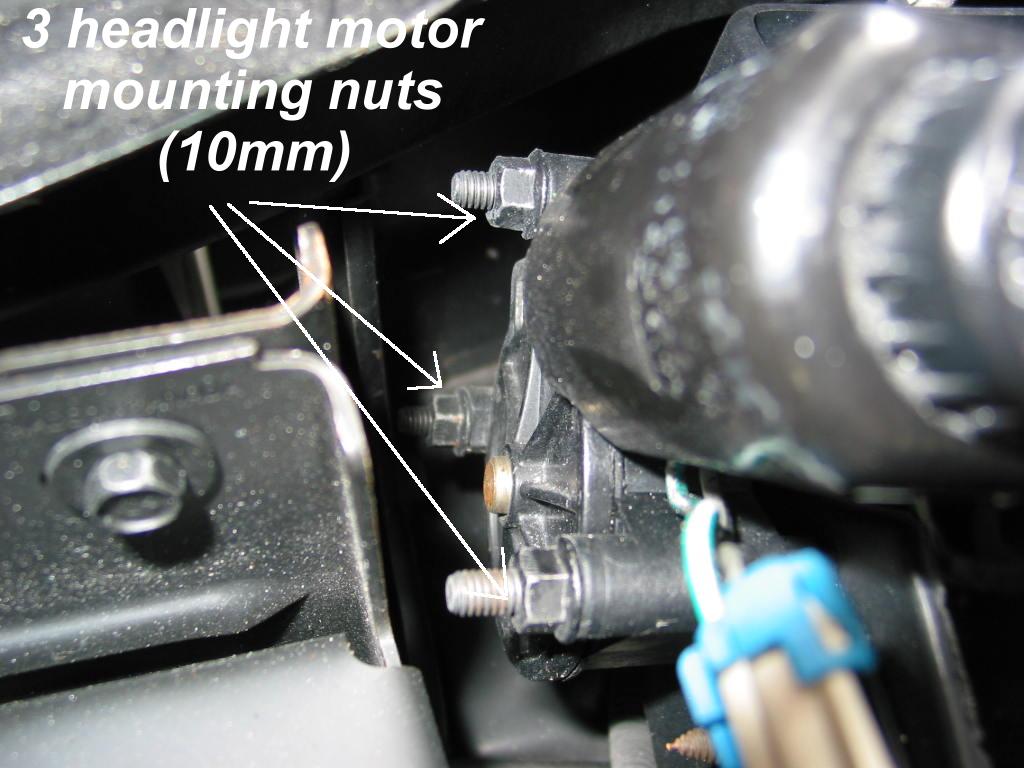 |
| I recommend using both a ratchet and a wrench because these are a bit difficult to get to. Be careful not to drop the nuts... they always seem to fall into an area that you can't get to! | 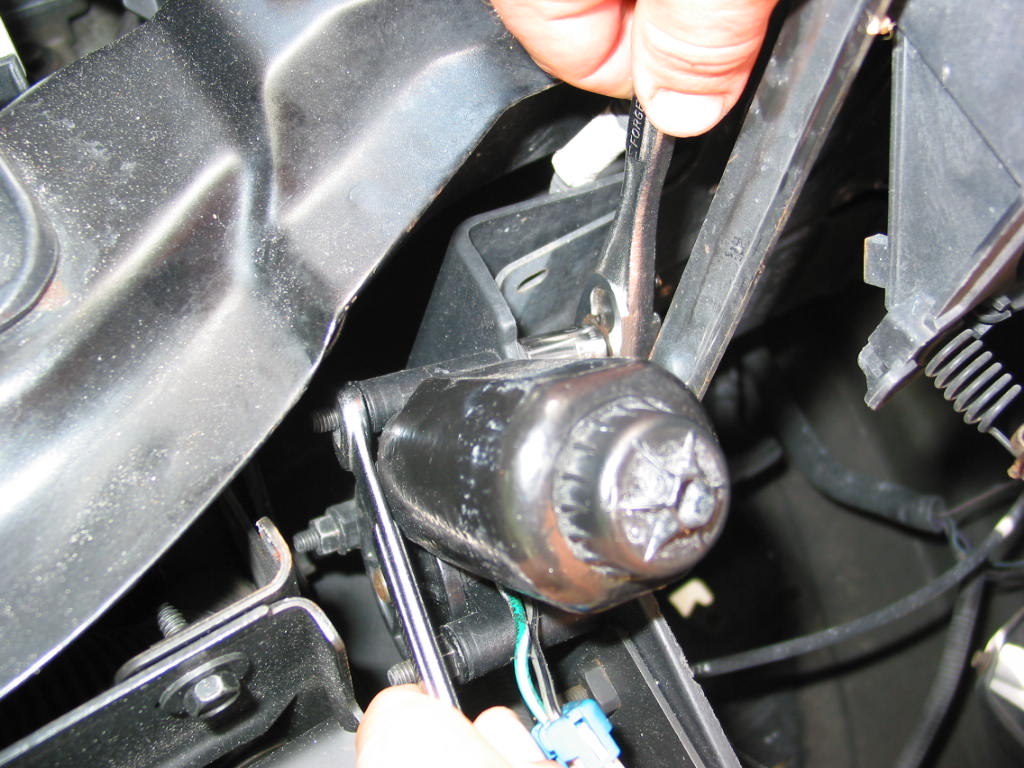 |
| Once the nuts are removed, pull the bolts out as well. | 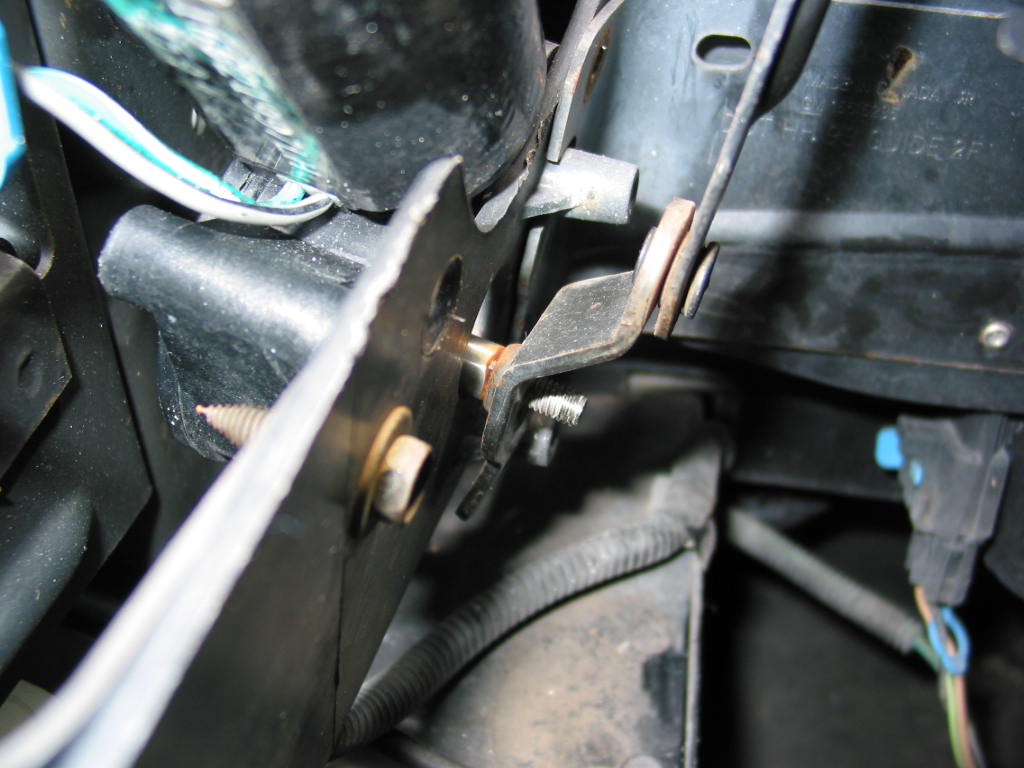 |
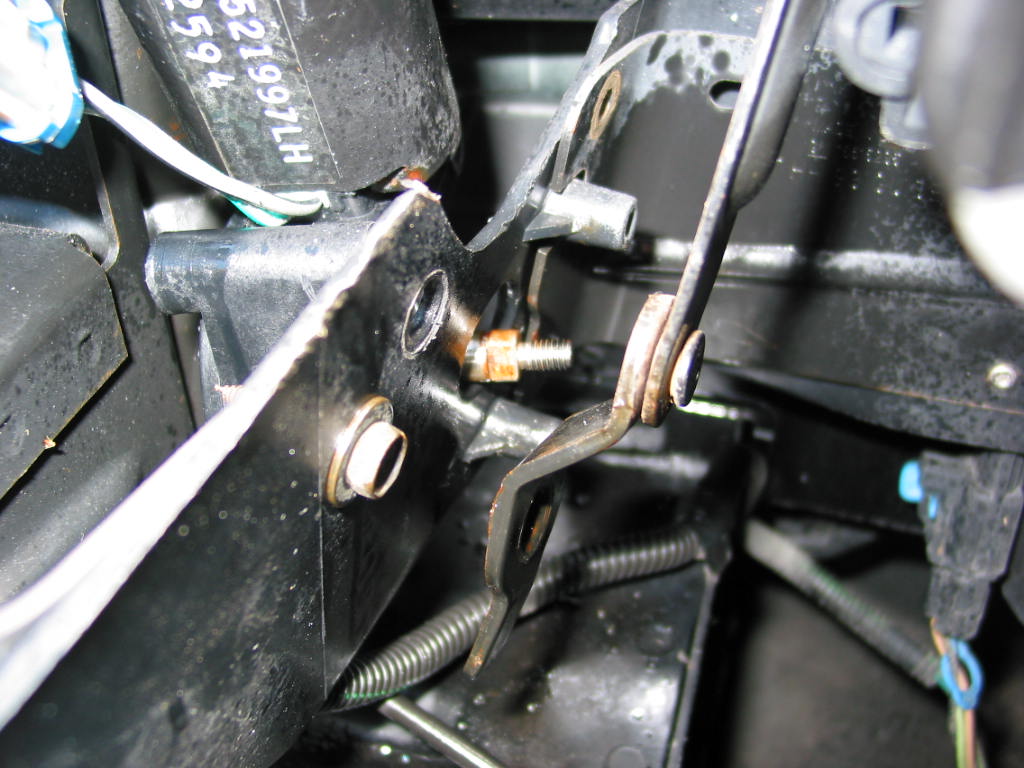
| Pull the raise/lower arm off of the motor shaft.
You'll probably need to use a flat screw driver or some type of pry bar to do this.
Just work it back and forth a bit and it'll come off. Don't force it... use
more Liquid Wrench if necessary :) It is mounted to "plastic" and this can
break! Keep in mind the raise/lower arm is the only thing keeping the headlight in the up position so when you pull this off, the headlight will fall! |
 |
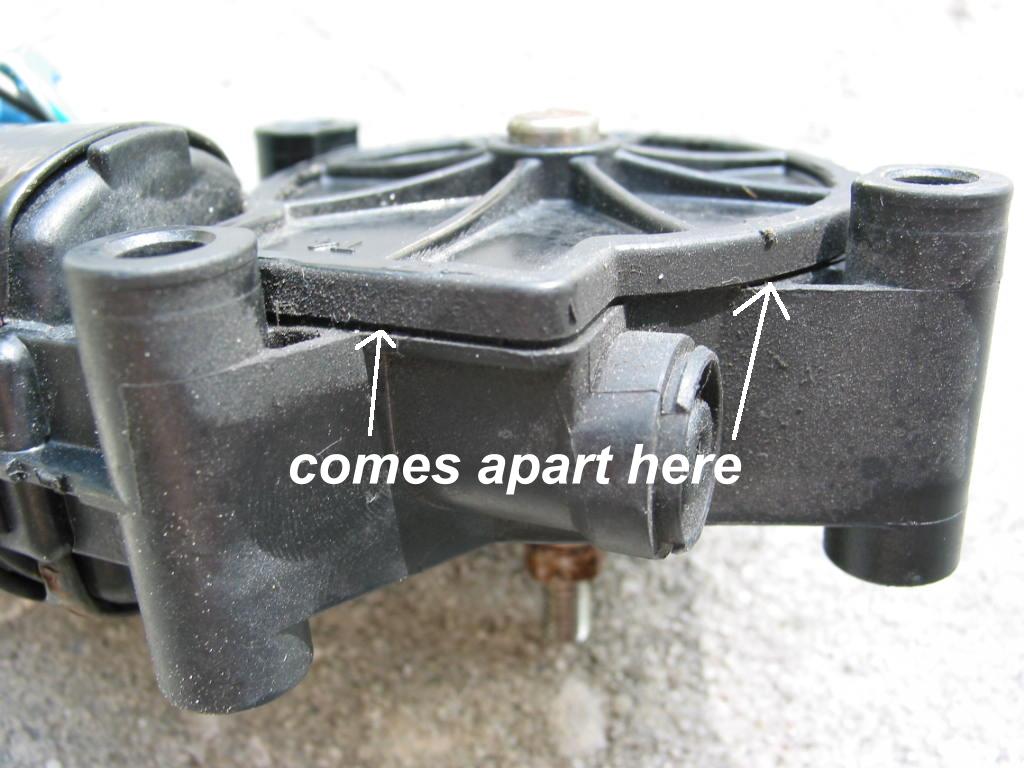
| This headlight motor assembly is not made to be serviceable and the cover is glued/snapped on from the factory. You have to pry this cover off. Shown here are the areas where you'll have to pry from. | 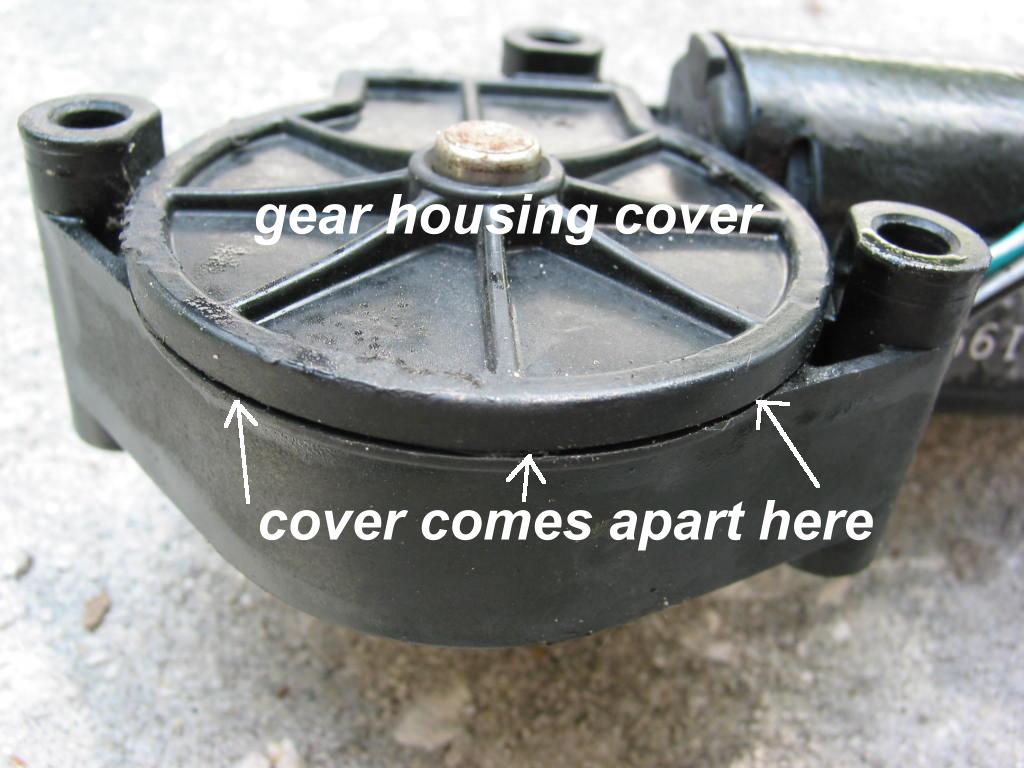
|
| I found it to be easiest to start prying at this location. You can get the most "grip" here :) Once you start it you'll hear it "snapping" loose. Note: I received an email from somebody I sold these gears to me and they told me they used a chisel to do the prying and it worked pretty good. So, that's another option for you! | 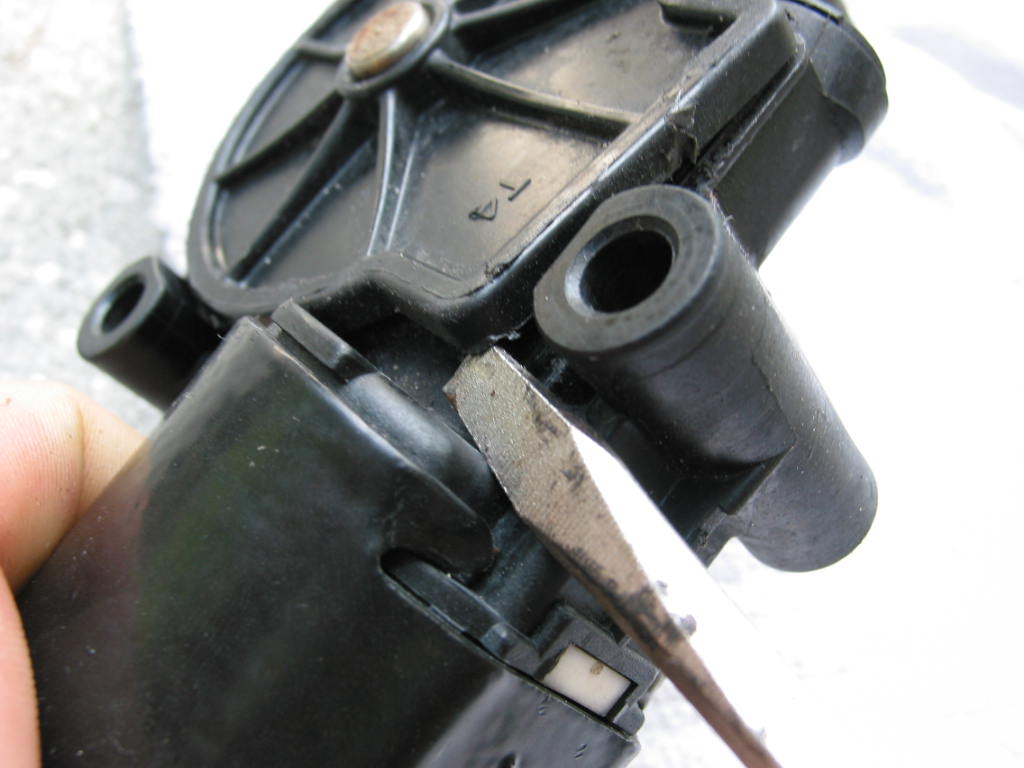 |
| It's easier if you use two screwdrivers... one to hold the cover up slightly and the other to finish popping the cover off. | 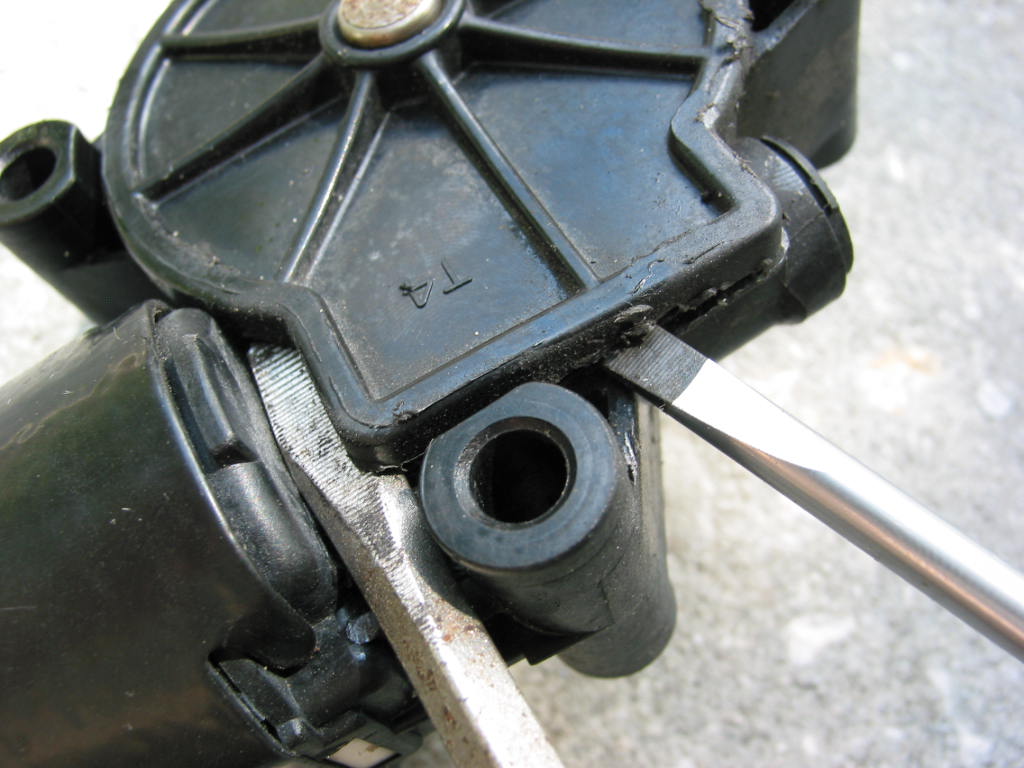 |
| Work your way around the cover while twisting/prying with the screw driver. I had some trouble with this one which is why the plastic is a bit "chewed" up. But, this is only a headlight motor and you can't see it when it is installed so no worries :) |  |
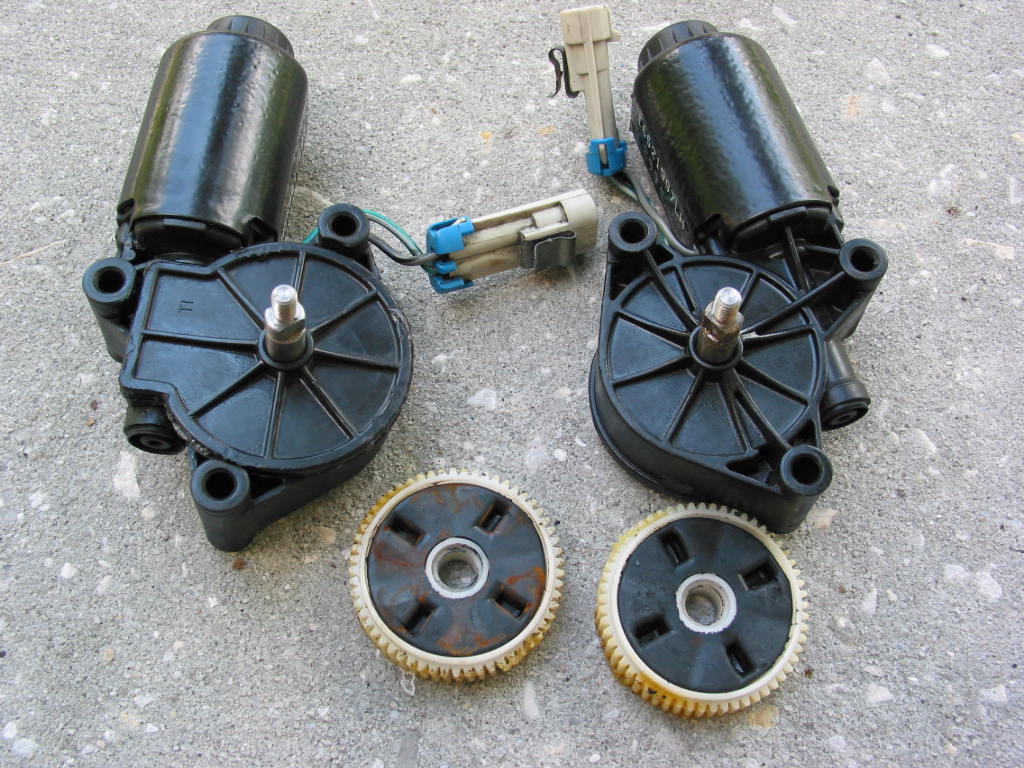
| Here is a picture showing a driver side headlight motor and a passenger side headlight motor. Note how both motor assemblies are exactly the same with the exception of the metal shaft! This is why a single gear design will work for both sides ;) | 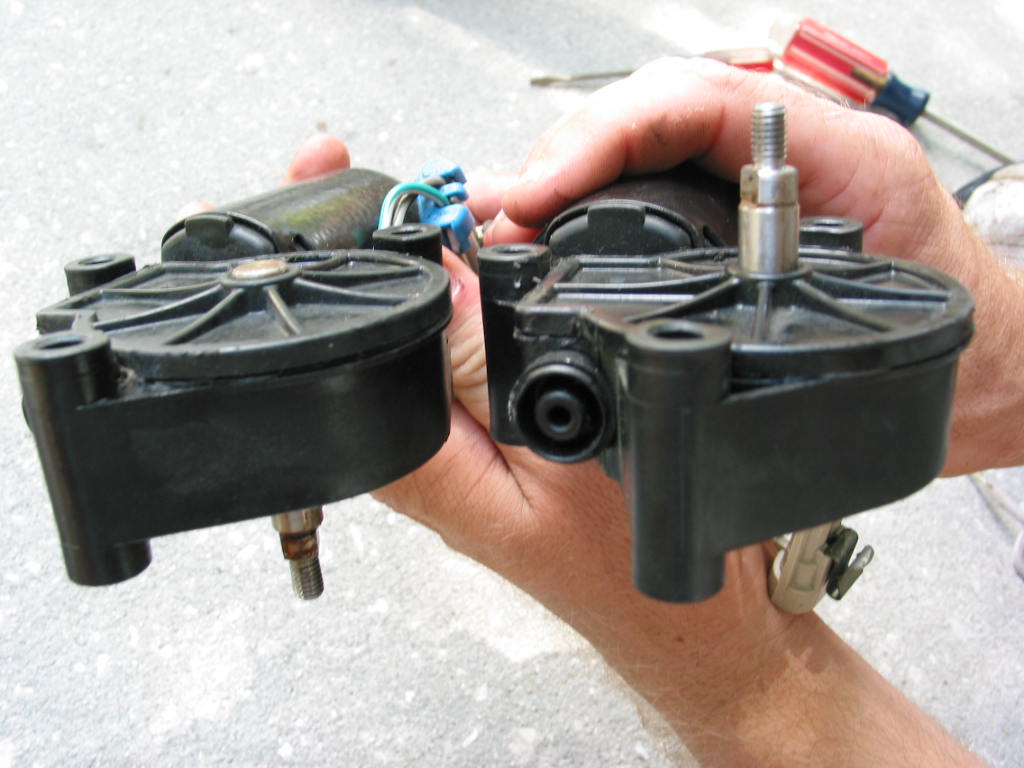 |
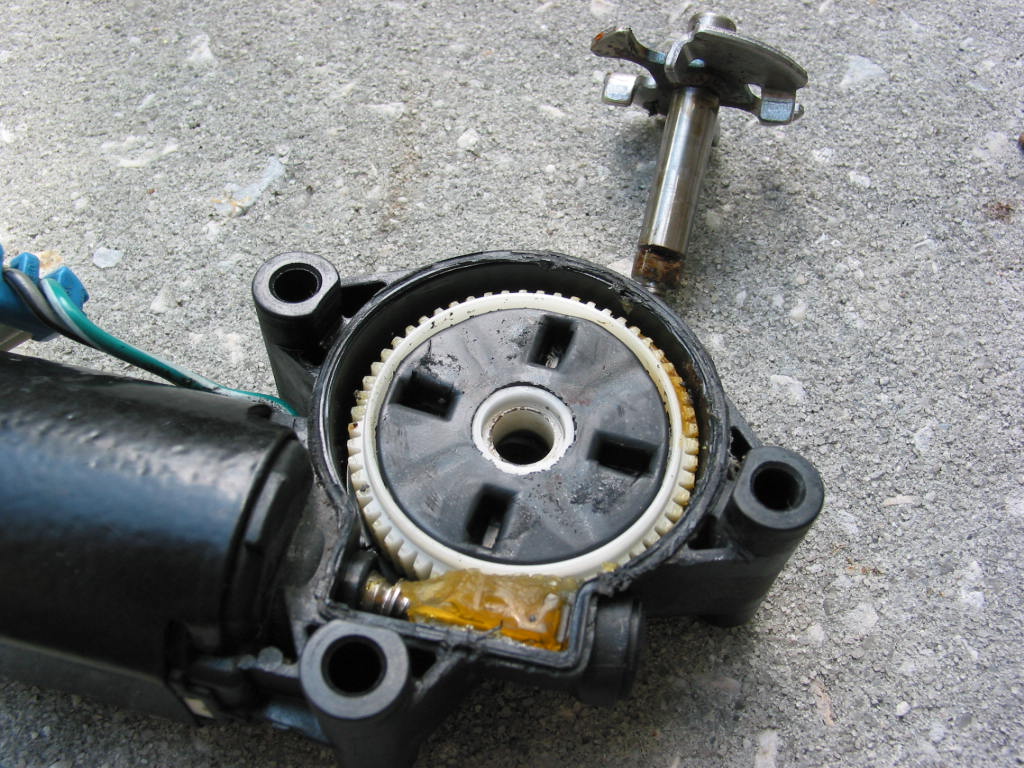
| With the cover removed you can see the factory nylon gear. |  |
| Pull the metal shaft out and lay it aside for now. | 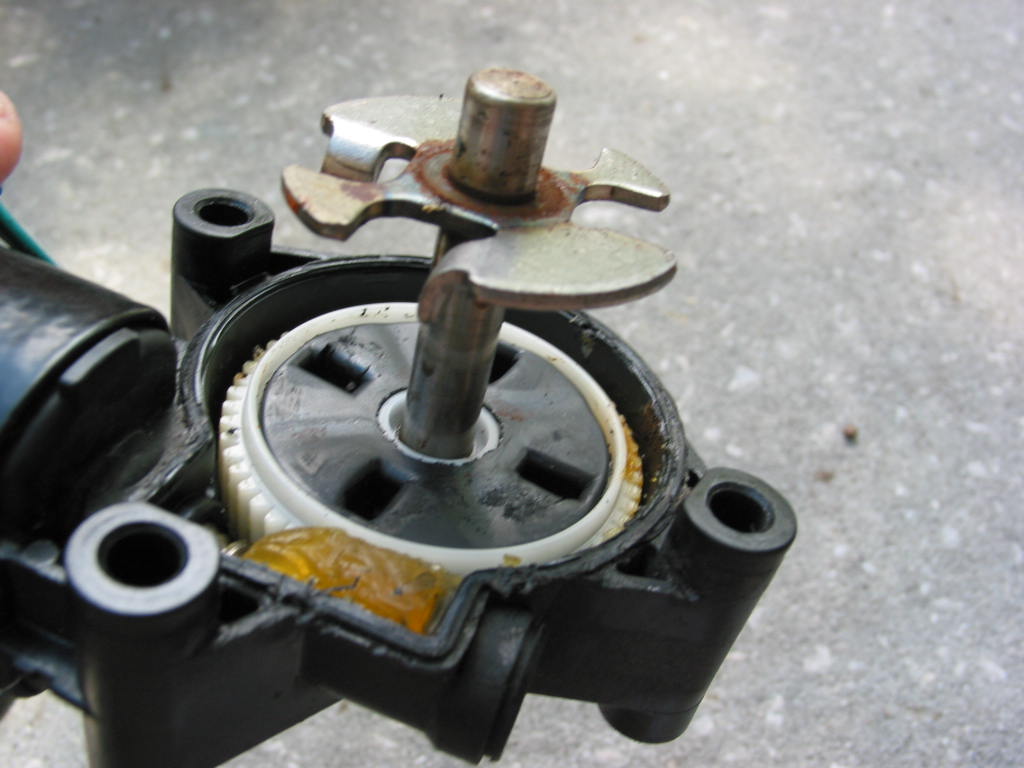
|
| Here is just another picture showing a left and right motor. Again, you can see everything is the same with the exception of the metal shaft. | 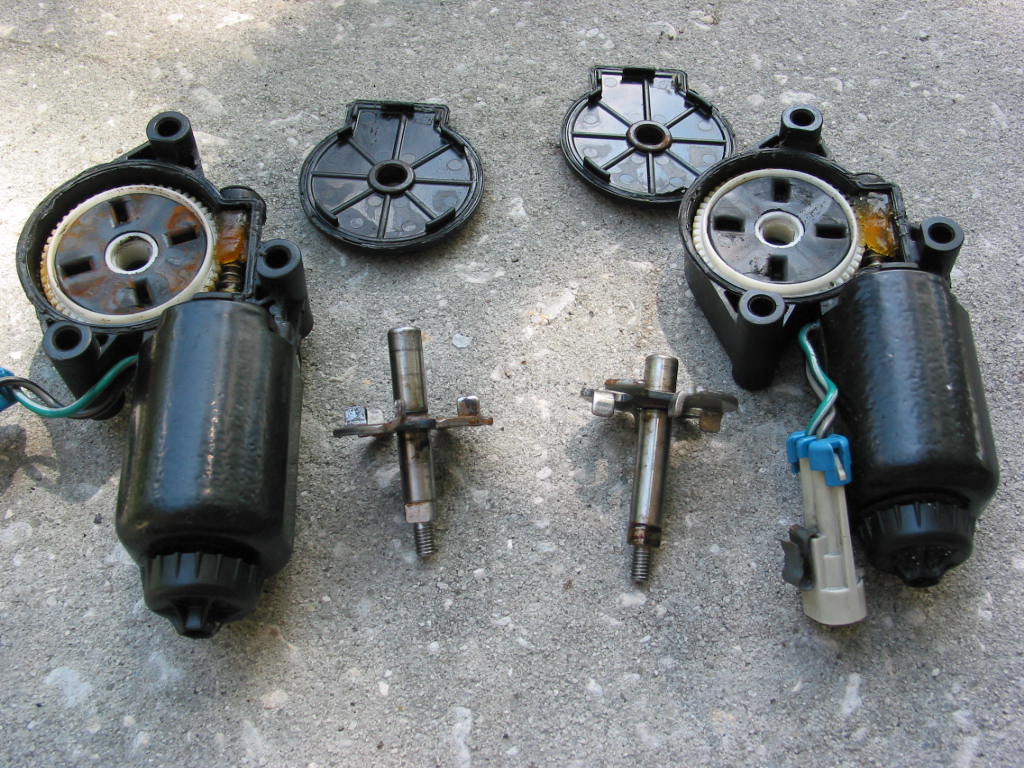 |
| Pull the nylon gear out and lay it to the side. | 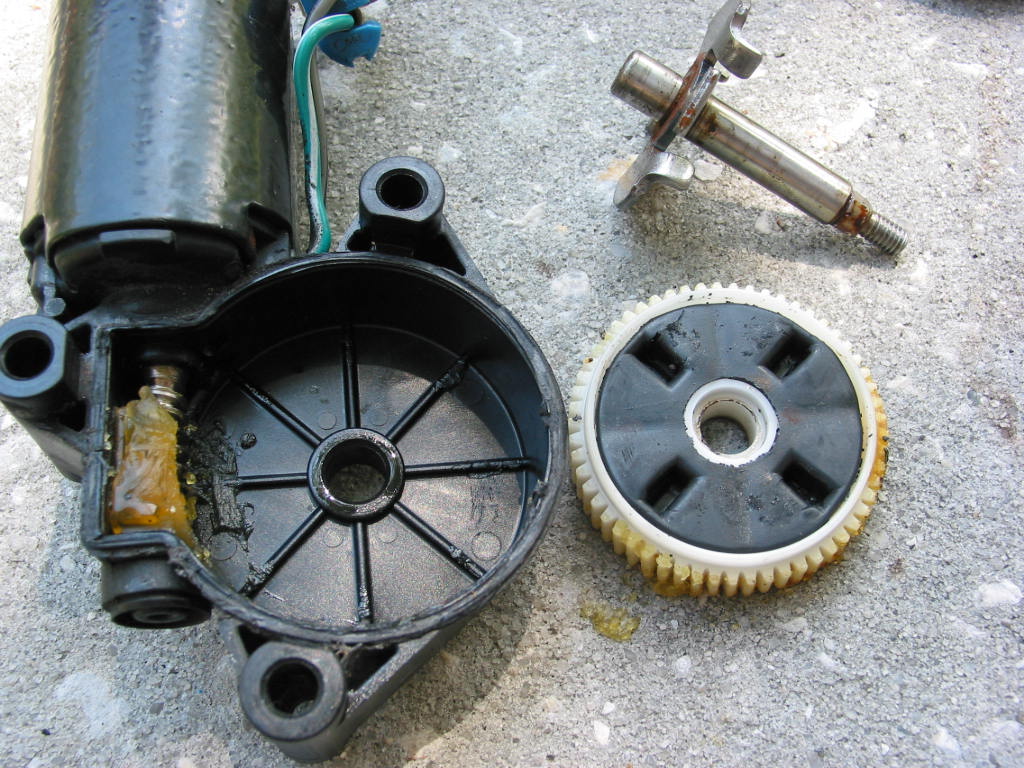 |
| With the nylon gear removed you'll see some left over factory grease. It is probably old and kinda spongy and dried up a bit. It'll be a good idea to re-grease the gears especially since we'll be doing metal on metal instead of metal on plastic! Any decent waterproof type grease like show will work. Graphite grease is the best and recommended. You can find this grease at your local auto parts store for about $2 to $4 a tub so it's not expensive. I wanted to include this grease with the "kit" but I couldn't find any place that sold little grease condiments :-) Plus, it isn't that expensive and many people have this stuff laying around anyway. | 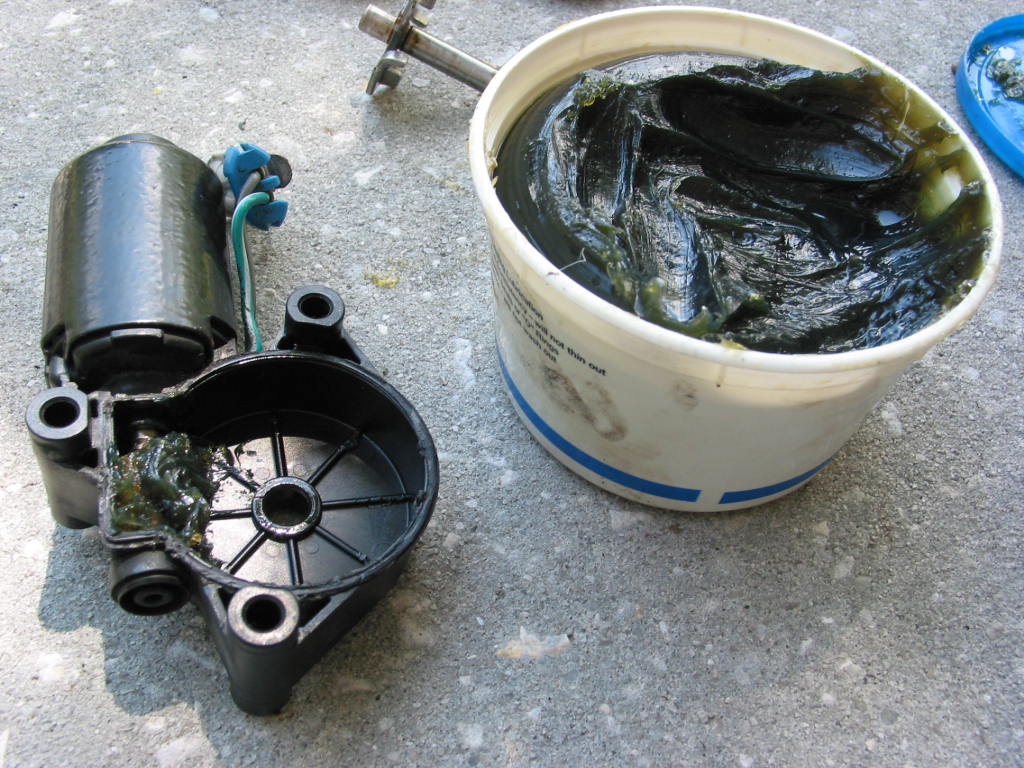 |
| With the grease in there, drop in the pretty new brass gear! As you can see here, I just put a bunch of grease in the area where the two gears make contact. If you want, you can even put the grease on the teeth of the brass gear all the way around it (even though only half of it was being used) just to make certain you've got plenty of grease in there. | 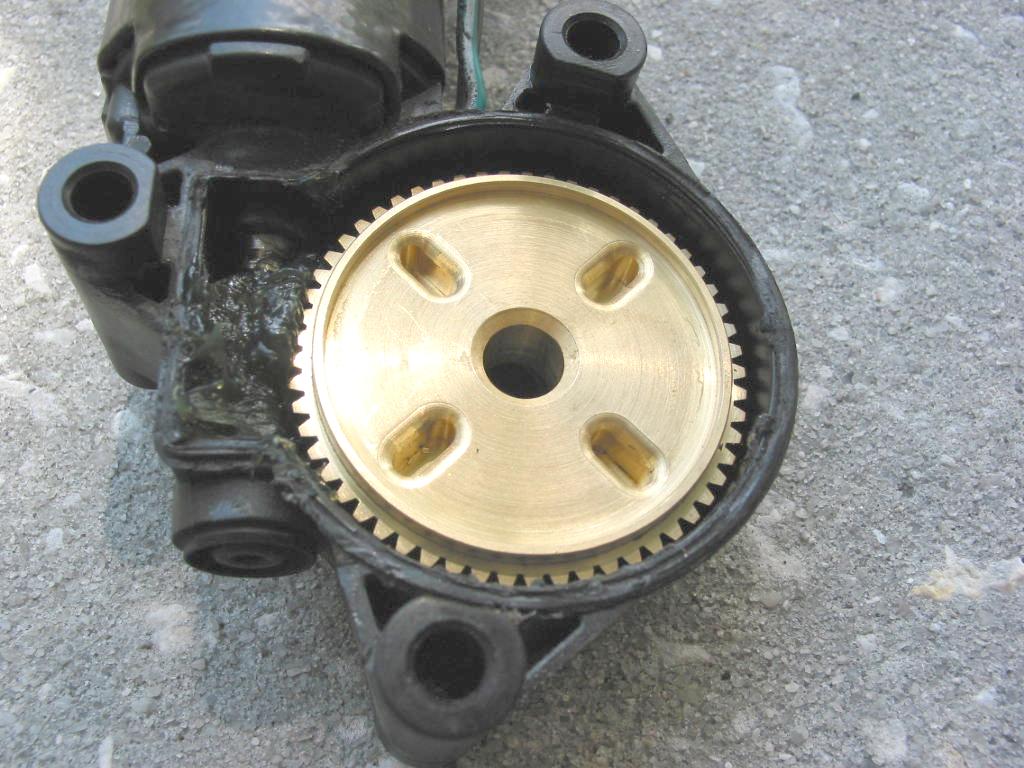 |
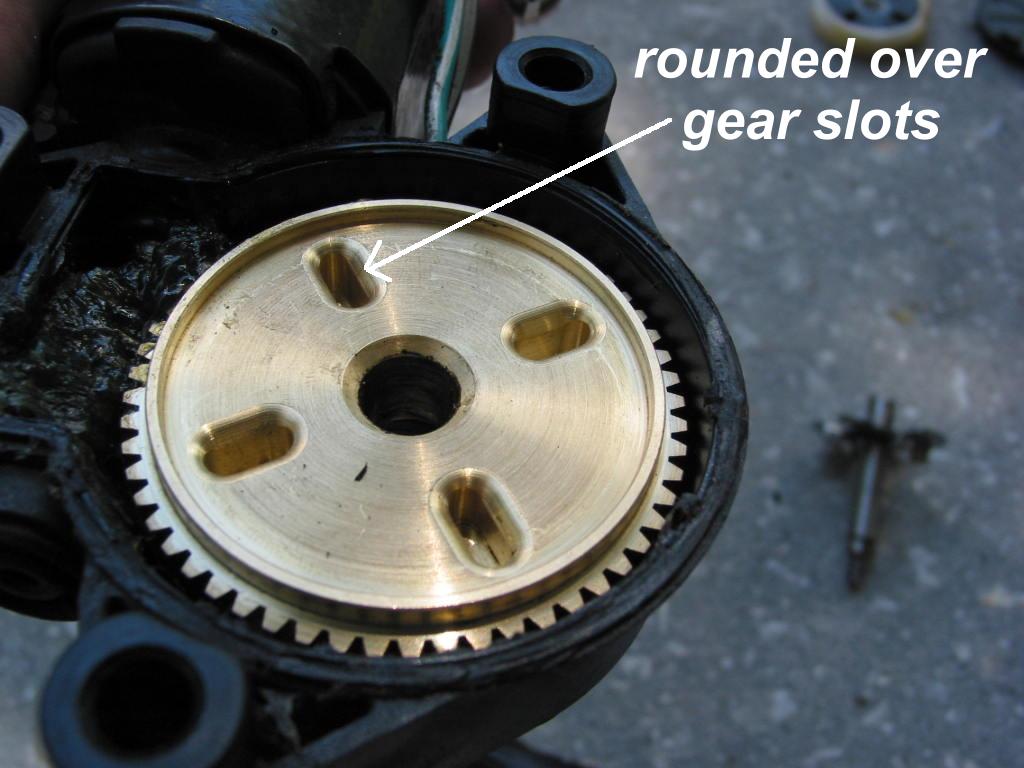
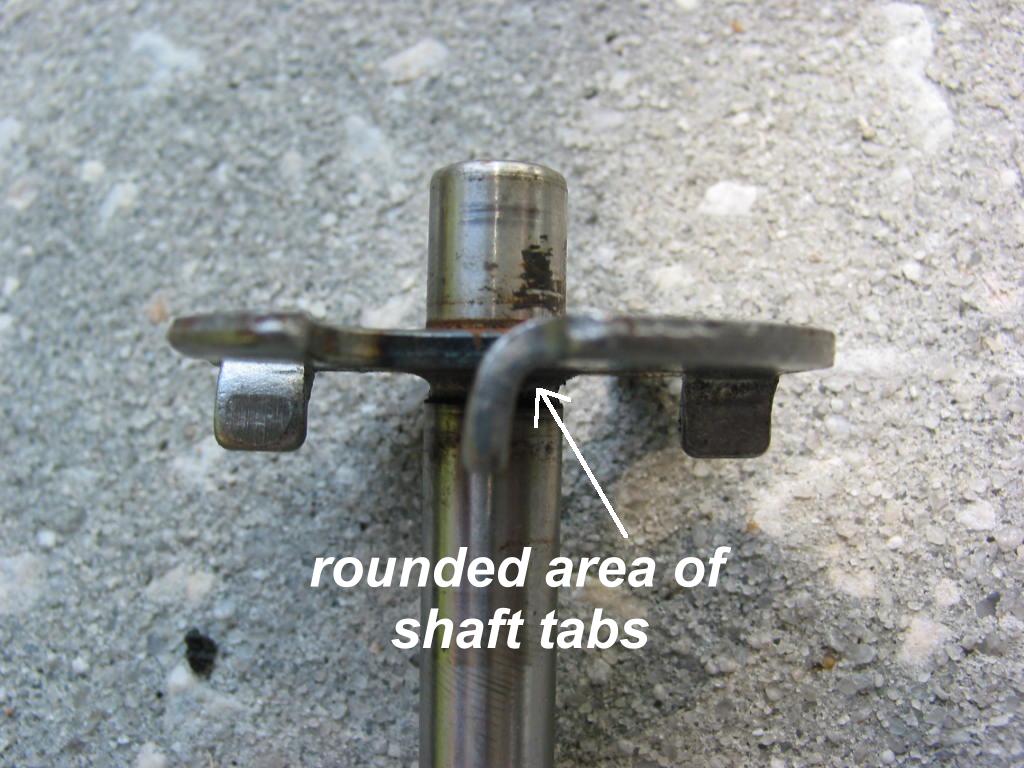
| This is just a little info for you... Notice on the shaft how the tabs are curved/rounded instead of being a perfect right angle? Now notice on the gear how instead of just having the straight slots for these tabs they are rounded as well. This was done to ensure full use of the metal shafts tabs and not just the tips. If the slots weren't rounded, the shaft wouldn't fully fit into the gear which would mean only the tips of the tabs would be being used. This extra step of rounding the slots off the brass gear to match the metal shaft makes for less stress on the tabs because more of their surface area is being used to do the work of raising the headlight! If you ask me, these are pretty impressive looking gears. Too bad we got to put the cover back on. LOL! :-) |
|
| You are now ready to insert metal shaft back into the
gear. Depending on a number of factors, the shaft may or may not just slide right
on. These gears were made using very tight tolerances... there is very little free
play in any of this. So, if your metal shaft has a little rust on the end of it or
is marred up for some reason, it may not want to slide through the brass gear very easily.
If you find this to be the case, you can use some fine sandpaper (like 600 or even
1500) or Emory cloth to smooth the shaft back out. You may also find the tabs don't want to go completely into the brass gear. If you experience this, there is nothing wrong with the gear... your tabs may be slightly bent or a little off. The gear definitely isn't "off" so it must be the tabs. LOL! If it doesn't happen to fit right in, pull it back out a little, rotate the shaft 1/4 turn and try pushing the tabs back into a different set slots in the brass gear. There are four different ways for the shaft to fit in and chance are one way will work. If for some odd reason you can't get it to fit good look at it closely and see which tab on the shaft is the problem and bend it in the proper direction. I doubt seriously you'll even have to mess with bending the tabs but I'm mentioning it just in case. You'll know you have it fitting correctly when the shaft assembly is sitting flush on the brass gear. |

|
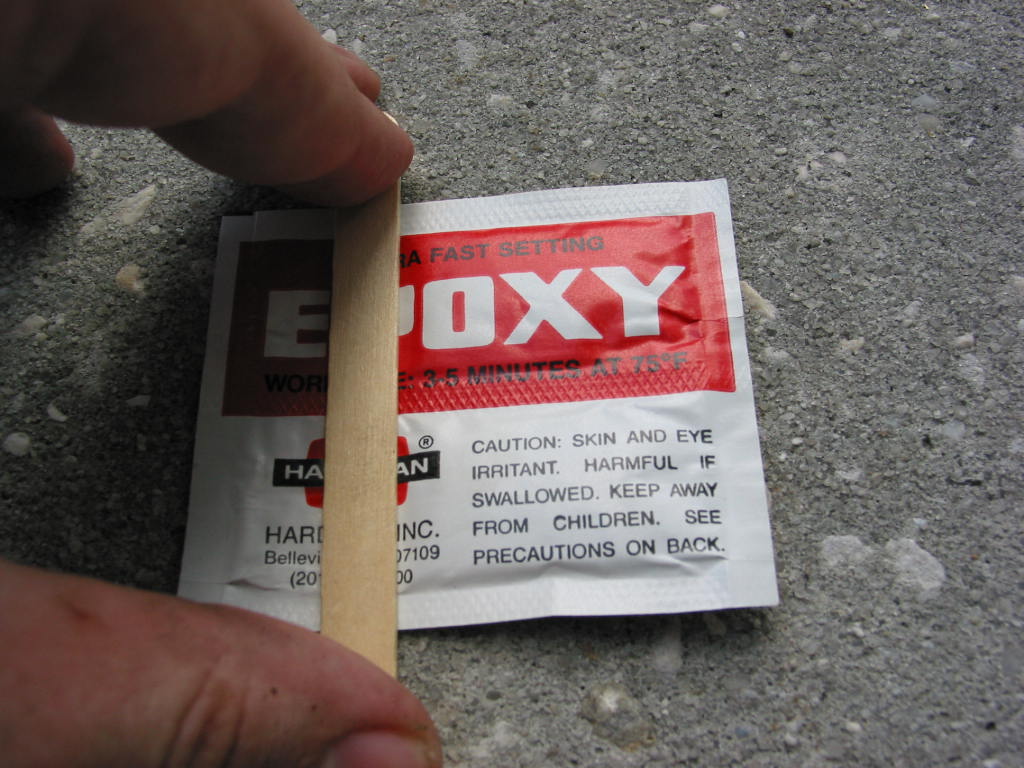
| You're now ready to put the cover back on! Test
fit the cover back onto the motor housing to make sure sure everything fits good and
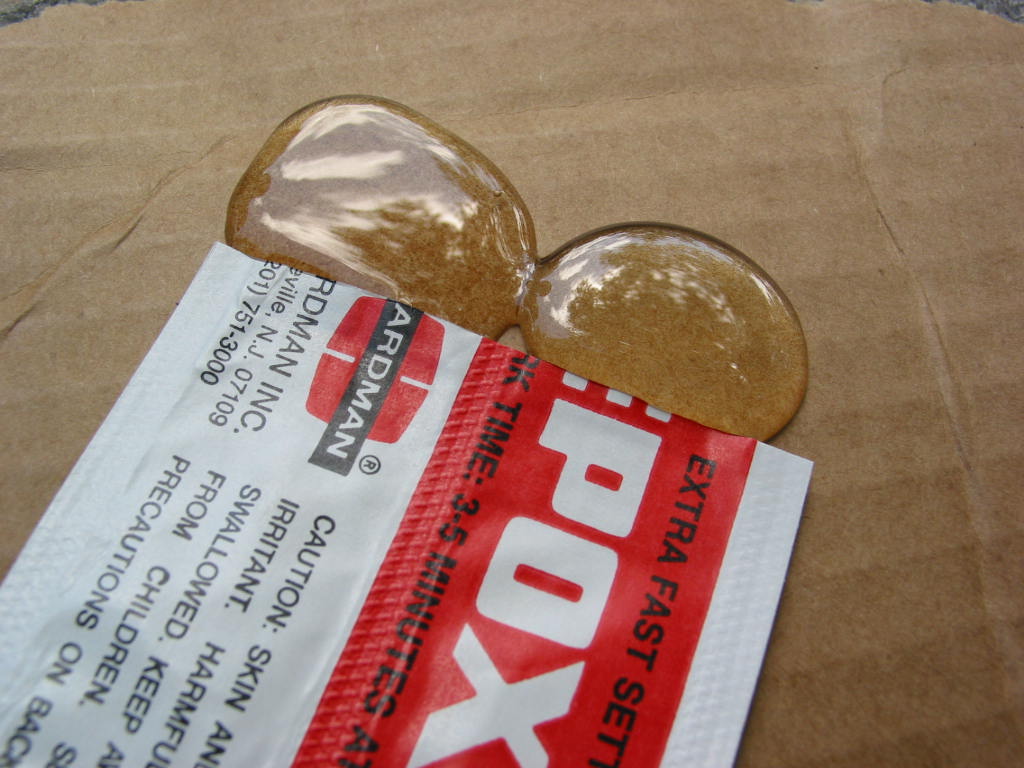
aligns properly. Grab the epoxy and Popsicle stick I sent. use the Popsicle stick and push the epoxy away from one end of the packet. This will allow you to cut the end off the packet without wasting any epoxy. |
 |
| This epoxy packet has two separate compartments.
One compartment holds the resin and the other the hardener. This is quick set
(3 to 5 minutes) epoxy and once the resin and hardener make contact with each other you
don't have time to mess around because it will dry on you quick! Cut the end off and squeeze the resin and hardener onto a piece of cardboard. Note: I didn't follow the directions to well. :) After I made this I read the back of the package. You can fold the epoxy packet then cut it and it'll squeeze the resin and hardner out together. |
 |
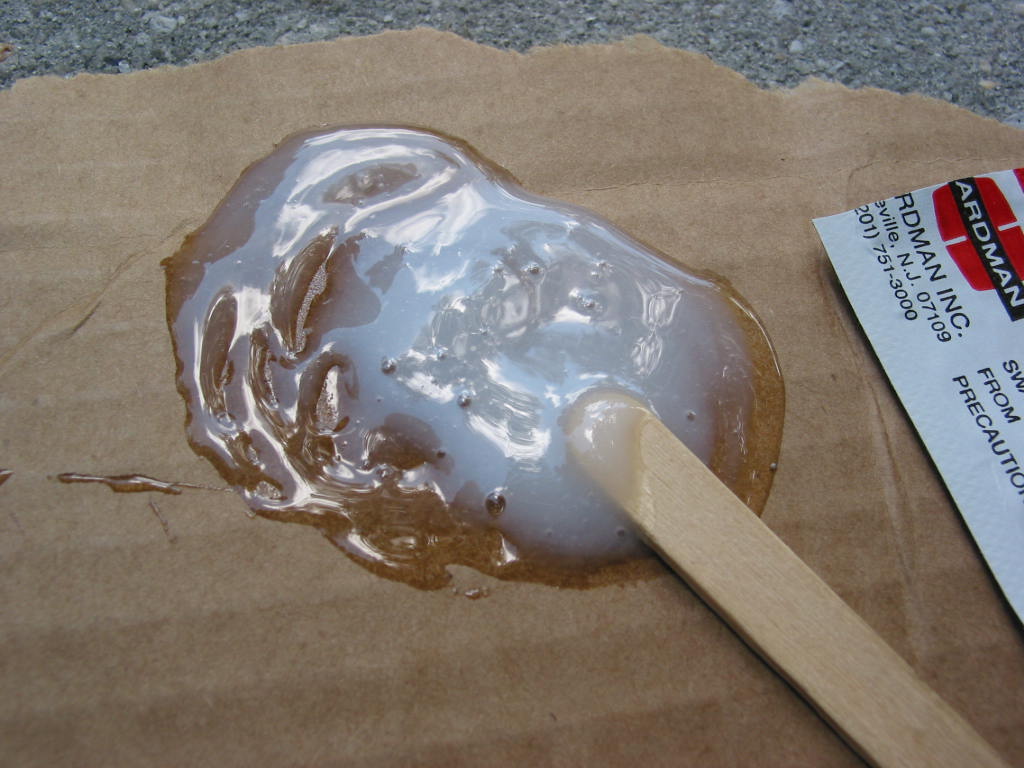
| Use your Popsicle stick and mix the resin and
hardener together. Mix it up good! Remember, don't delay or you'll be going to
Wal-Mart and buying your own epoxy at like $5 a tube :-) If it does setup on you, don't use it! It won't have good enough bonding properties to keep the cover in place. |
 |
| Use the Popsicle stick and liberally spread the epoxy
on the edge of the entire cover. Try to cover the edge completely as this will help
to prevent water from entering. Once you get the epoxy on the entire lip, push the
cover back in place (you already test fit it so you know it works!) and make sure it kinda
snaps down. Hold the cover tight onto the housing for a few minutes to ensure it
stays tight. Note: Two people have emailed me saying they had problems getting the cover to stay after a few uses. I think this is due to not using enough epoxy. Don't skimp on the epoxy! Really pile it on there thick... thicker than it appears in this picture even. Too much won't hurt and if it "oozes" out the side then just spread it around a little to make it seal even better. If the cover does come off during use what can happen is the shaft can back out a little and the gear may not align properly with the worm drive and you'll experience uneven or premature wear on your brass gear! I recommend checking to make sure the cover is still intact a couple days after you finish the install. Then, check again after a week or two. You don't want this cover to come off during use! |
 |
| Ahh... two FIXED headlight motors! Try to let the epoxy set/dry for at least several hours before re-installing the motors. And, if possible, after re-installing them let it set overnight before operating them especially if you only waited a few hours before installing them. We just need to make sure the epoxy sets up good before you operate the headlights. THIS IS VERY IMPORTANT... Now is also a good time to check and ensure the metal housing around the motor itself is fastened securely to the plastic gear housing. If it wobbles back and forth it can cause problems and wear on the brass gear because the worm drive doesn't fully make up with the brass gear. To prevent this, ensure the metal motor housing is TIGHT and doesn't wobble back and forth. If it does, try to bend the metal tabs over more to make the metal motor housing tight and snug. If you don't fix this and yours wobbles, there is a chance you will also strip your brass gear! |
 |
| Putting it all back together is essentially the same
as taking it apart :) However, if you are doing both lights at the same time, it may
not be intuitively obvious as to exactly how to put the raise/lower arm back on the shaft.
When doing this, pay particular attention to the plastic stop at the bottom.
The raise/lower arm needs to be in FRONT of this stop and not behind. If you put it
behind the stop you'll immediately know something is wrong because the lights won't go up
all the way :) Once you get everything back together, use the raise/lower knob to manually lower the headlight back down. DO NOT FORCE IT DOWN WITH THE KNOB! If the headlight won't go down flush, check for an obstruction... maybe your trim piece isn't on right or something like that. In fact, I recommend that when the headlight starts getting close to being down and you feel some resistance, stop. The first time you turn on your lights, they may not go up. This is normal. Turn the lights back off then back on again. Using the raise/lower knob can sometimes freak out the headlight module. Turning the lights off and on again will reset the module. |
 |
Well, that's it for the install of your new CNC brass gear! No more terrible headlight noises again! LOL! Also, if you haven't already read, fixing the stripped gear will often times fix other problems with the lights as well such as them popping up for a second then going back down when you turn on your fog lights or them just staying up with only the fog lights on. Fixing the gear often times fixes all the other strange problems as well :) Also, I shouldn't even need to mention this but will anyway... this gear comes with ZERO warranty. It is a brass gear with no moving parts so the likelihood if it breaking is slim to none barring the front of your car being hit by a freight train and that's rather unlikely :) Use this gear at your own risk. It's heavy and if you drop it on your foot it might hurt, ok? LOL! Also, please don't come to me after a month, a year, whatever and ask me to buy you a new part for your car blaming the failure on this brass gear. If you are worried about something like that please don't buy one. Keep in mind, it is nothing more than a duplicate of the nylon gear only made out of a stronger material. I've tested it and it works great... if you want a laboratory test proving it is going to last like 10 years... well, I don't have that :) Like I mentioned above, I'm doing this for you Pontiac guys as an alternative to spending $200 or more on a new headlight motor which would most likely fail on you again later down the road. Also, this brass gear is obviously WAY stronger than the nylon gear which came in it to begin with. Out of the probably 1,000 emails I've got about the FREE fix (see below) only one person has ever mentioned to me about a headlight module going bad and when it went bad the lights didn't go up or down at all. Now, I have never heard of a module failing such that it tells the headlight motor to stay on CONSTANTLY but I'm sure a failure like this is possible even though highly unlikely. IF this were to happen, I have no idea what would fail first... would it be the motor? The brass gear? A fuse? I really don't know FOR SURE but I'm fairly certain a fuse would blow before the motor went out. I don't think that brass gear is going to strip so I'm not even going to consider that as an option. LOL! Basically, if something doesn't look right or sound right, make it "stop" and find out why :) |
|